If you have an air handler hanging out over your living room, you basically own a water feature on stilts. When the condensate line clogs, that feature becomes a waterfall with drywall confetti. The fix that saves your ceiling is a tiny device most folks ignore: a condensate float switch, also called an overflow shutoff switch. It costs about 20 bucks and it shuts the system off before water can jump the pan and baptize your couch. I restore water and mold damage for a living, and I’m telling you straight: I’d rather you never need me. Install the switch, test it once a year, and keep that drain line from turning your attic into a slip-and-slide.
What A Condensate Float Switch Does
Your air conditioner is a dehumidifier in disguise. It pulls moisture out of the air and that water drips into a primary drain pan, then flows away through a condensate drain line. When that line gets clogged by algae, dust, pet hair, or anything else living its best life in damp plastic, water rises. A condensate float switch sits in a strategic spot and watches the water level. If water climbs too high, the float lifts, the switch opens the low-voltage control circuit, and your system shuts down. That pause keeps the pan from overflowing into your ceiling cavity.
Manufacturers and supply houses also call them overflow shutoff switches or Safe-T-Switches. They come in a few styles, but the job is the same: kill the cooling before water kills your ceiling, floors, and sense of humor.
Where The Switch Goes
You’ll see two drain pans in most attic or closet installs. The primary pan is built into the evaporator coil or air handler and handles day-to-day condensate. The secondary, also called the auxiliary or emergency pan, is the bigger metal pan sitting under the entire air handler. If your air handler is above a finished space, codes typically require that secondary pan and a safety device like a float switch or a separate emergency drain line to a place you will notice, like an eave or window. The float switch belongs in one of these three spots:
Inline or trap fitting, often called an SS-1 style. This switch lives in a special tee or trap section of the primary drain line. When the line backs up, water rises in the fitting and trips the float. Pro: it reacts early because it sees the backup right at the source. Con: if it isn’t level or the trap is wrong, it can be fussy.
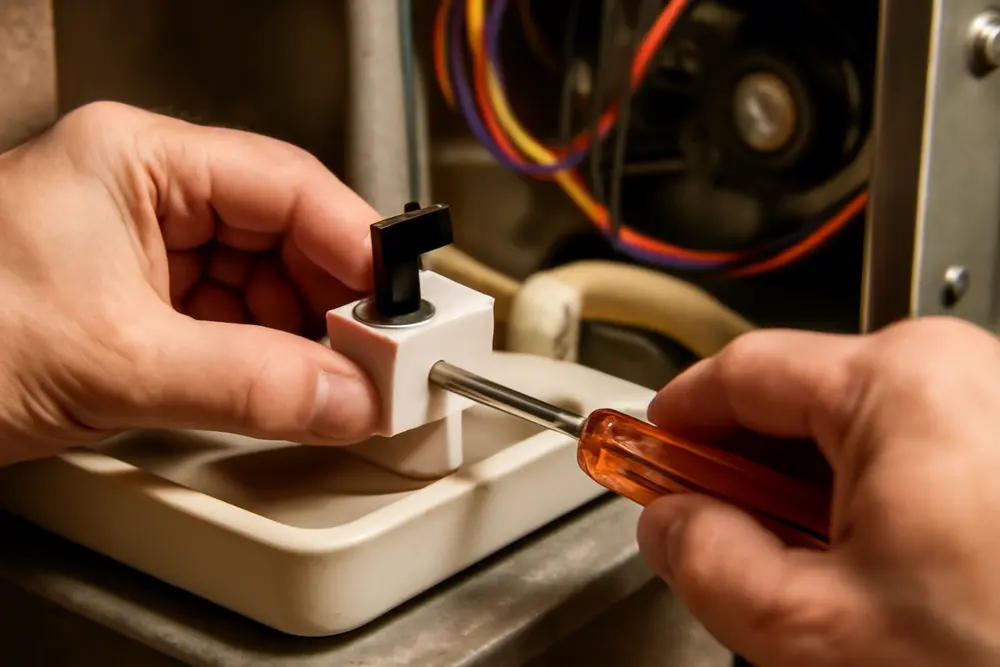
Auxiliary drain port elbow or tee, often called an SS-2 style. Many coils have a secondary drain port. A compact float fits into a short elbow there. Pro: easy and tidy. Con: if the primary pan overflows somewhere other than that port, water may reach the secondary pan before this float trips.
Pan-mounted switch, often called an SS-3 style. This one clips or screws to the lip of the secondary pan. When the secondary pan starts to fill, the float goes up and shuts everything down. Pro: great last line of defense for ceiling protection. Con: if the switch is mounted too high or the pan is dented, you might get spillage before the trip.
Here’s the ideal setup when your unit sits over finished drywall: install a pan-mounted switch in the secondary pan and keep that pan connected to a separate emergency drain to an obvious drip point. Add an inline switch in the primary line if you want to catch problems even sooner. Redundancy is cheaper than sheetrock.
How It Stops Ceiling Leaks
Ceiling leaks from AC are almost always a story about pressure, gravity, and neglect. Warm, humid air hits a cold coil, water condenses, and the condensate line quietly carries it away. Then summer slime grows. The line narrows. One day it clogs. Water backs up into the primary pan and starts rising. If nothing intervenes, water climbs over the pan edge and finds the path of least resistance into insulation and drywall. That is when you notice a brown ring on the ceiling and smell something that reminds you of a locker room.
The condensate float switch breaks that chain by cutting power before the pan spills. The system stops cooling so it stops making water. The pan level drops as whatever can drain does. You still have a clog to clear, but you do not have a soaked ceiling. That tiny device trades a sweaty afternoon for a five-thousand-dollar remodel and a mold remediation bill. Worth it.
Quick Test And Inspection
Testing a condensate float switch should be part of your pre-summer ritual, right up there with changing filters. Do it when the system is dry if possible, and always kill power at the disconnect or breaker first. Here is how to check the common styles:
Pan-mounted switch: find the little float in the secondary pan. Restore power. Gently lift the float. The indoor unit or outdoor condenser should stop within seconds. Drop the float and the system should restart after a short delay. If nothing happens, the switch might be miswired or dead.
Auxiliary port elbow switch: remove the short elbow from the aux port, making sure not to crack brittle plastic. Many models have a small internal float you can lift by hand. Trip it and look for shutdown. Re-seat it fully and level when done.
Inline or trap switch: these are usually in a tee with a removable cap. Open the cap and manually raise the float arm if present. Some designs require you to add a bit of water to the tee to float the switch. Watch for shutdown, then dry it out and close the cap.
While you are there, inspect the hardware. The float must move freely. No algae mats gluing it in place. No cracked housings. Wiring should be clean and tight, not twisted together like a last-minute science project. Many float switches are wired in series with the thermostat R circuit feeding Y or into a dedicated safety terminal. If your system is communicating or uses a fancy control board, wiring can be trickier, which is a perfect time to punt to an HVAC pro.
How often should you test? Once a year at minimum. If you live somewhere swamp-humid, twice a year is smart. A five-minute test in April saves hours of mopping in July.
Maintenance That Actually Works
The switch is your seatbelt. Maintenance is your brakes. Keep the drain clean and the switch probably never has to save the day. Here is what actually helps:
Flush the primary drain line. At the air handler, remove the cleanout cap on the drain tee. Pour in warm water with a splash of vinegar. It dissolves light slime without eating your fittings. Let it run through and out the exterior drain. Avoid bleach inside near coils and metals because it can be corrosive. If you want to go harder, use a condensate-safe cleaner designed for HVAC.
Vacuum the exterior drain. Go outside where the drain line exits. Hook up a wet-dry vac to the pipe and pull out the gunk. Use a rag or adapter to get a decent seal and run the vac for a minute or two. You will be amazed and slightly horrified by what comes out.
Make sure the trap is correct. The drain often needs a P-trap so the negative pressure in the air handler does not hold water in place. If the trap is missing or looks like a drinking straw sculpture, get it corrected. Wrong trap equals chronic backups.
Keep the secondary pan clean. Vacuum out dust and debris. Check for rust holes in metal pans. A rusted pan is a time bomb because it will not hold that first surprise overflow. Replace it if it is paper-thin or pitted through.
Use tablets if you must, but do not rely on them. Condensate pan tablets can slow slime growth, but they are not a substitute for a good flush and a proper trap.
Inspect the switch wiring connections annually. Corrosion or loose spade terminals make safety devices unreliable. If you jiggle the wire and your system flickers, you have a problem to fix now, not later.
DIY Install Basics
If you are handy and your unit is accessible, installing a condensate float switch is a pretty straightforward Saturday win. Work safely and do not guess on wiring. Here is the short version:
Cut power to the air handler at the breaker and the disconnect. Confirm with a non-contact tester. Remove the furnace or air handler panel so you can access the low-voltage terminal block and drain fittings.
Choose the right style for your setup. If you have a clean straight run of primary drain near the unit, an inline switch is a solid choice. If your coil has an auxiliary drain port, the elbow style is clean and compact. If your unit sits above a finished space and you already have a secondary pan, add or replace the pan-mounted switch there regardless of anything else.
Install the hardware. Inline switches glue into PVC, so dry-fit first, mind your trap, and keep the switch body level so the float can move properly. Elbow switches seat in the aux port with a gasket or thread sealant if required. Pan switches clip or screw to the pan edge at a height where they will trip before the pan overflows.
Wire in series with the control circuit. Most commonly, you will break the R feed to Y at the air handler. That means R leaves the control board, goes through the float switch, then comes back to the Y terminal. If the switch opens, the compressor call dies. Some installers prefer to interrupt the R to the thermostat or land on a dedicated safety input if provided. Follow the switch diagram and your unit’s wiring diagram. Do not wire the switch in parallel, and never bypass it because the system “won’t run.” That is the point.
Test it. Restore power, lift the float, confirm shutdown. Put the float back down and confirm the unit restarts. If your thermostat locks out on safety, reset it per the manual.
If any part of that made you sweat more than your attic, call a pro. Incorrect wiring can cook a board, and poorly glued PVC can leak. A quick service call is cheaper than parts and drywall.
When To Call A Pro
There are times to throw the wrench down and pick up the phone. If your air handler is buried in a crawlspace that feels like spelunking, let someone else do it. If your system is a communicating, smart, or variable-speed unit, the control logic may not play nice with a simple interrupt, and your installer will know the right terminal or kit. If you are dealing with repeat backups, you might have slope issues in the drain line, a missing or mis-sized trap, a cracked primary pan, or a negative static pressure problem inside the cabinet that is stalling drainage. Those need trained eyes and sometimes some duct adjustments.
If water already made it into insulation or drywall, get a restoration team in right away to dry it correctly. Hidden moisture grows mold fast in a warm attic or wall. Extraction, strategic demolition, and professional drying beats the bleach-and-hope method every time.
What It Costs
Hardware is cheap. Mistakes are not. Here is a simple snapshot of typical pricing in most markets:
| Item | Typical Cost |
|---|---|
| Condensate float switch | $15 to $40 |
| Professional install | $100 to $300 |
| Ceiling drywall repair from a small leak | $400 to $1,500 |
| Mold remediation from a hidden attic leak | $1,000 to $6,000+ |
Even with labor, the switch is the cheapest insurance policy your air handler will ever get. If you want redundancy, install an inline switch and a pan-mounted switch. Two tiny parts are still cheaper than repainting your living room.
Code And Best Practices
When an air handler or coil is above a finished ceiling or in an attic above a living area, model codes typically require one of these: a secondary drain pan with a separate drain to a conspicuous location, a pan with a float safety device that shuts the system down, or a secondary drain line from the coil’s auxiliary port. The smart move is to combine a secondary pan and a float switch. If your home is older, you might be missing the pan or the switch entirely. Upgrading is simple and well worth it. Also check that the emergency drain from the pan terminates where you will notice a drip, not over a flower bed or buried in mulch. If you see water dripping from a little pipe over a window or eave, that is your AC telling you to kill the cooling and clear the primary drain right now.
Avoid These Common Mistakes
Mounting the pan switch too high so the pan spills before the float trips. The float should trigger with room to spare.
Gluing in an inline switch without leaving a cleanout. You will hate yourself later when the line clogs.
Bypassing a safety on a hot day to get cooling back. That is how ceilings get baptized.
Skipping the trap or pointing the drain uphill. Water does not flow uphill, and negative pressure will hold it back if there is no proper trap.
Forgetting to test after installation. If it does not shut the unit down on a simulated trip, it will not save you during a real one.
Signs Your Drain Is Already In Trouble
Water dripping from the emergency drain pipe outside. That is the bright red flag you cannot ignore.
Musty, gym-sock smell when the AC runs. Slime party in the pan or line.
Gurgling noises near the air handler. The trap is burping because flow is restricted.
Intermittent system shutdowns with no other error. Your float might be tripping and resetting as water sloshes around the pan.
What About Condensate Pumps?
Some installs use a small pump to lift condensate to a drain. Most good pumps include a built-in safety switch that breaks the control circuit if the pump fails or the reservoir fills. If you have a pump, keep its reservoir clean, test its safety switch, and still consider a pan-mounted float if the unit sits over finished space. Pumps fail. Gravity never calls in sick.
Upgrading An Older System
Older air handlers might lack an auxiliary drain port, a cleanout, or a decent secondary pan. You can still add protection. A pan-mounted switch clips on almost any metal or plastic pan and takes minutes to wire. If your primary drain run is long and you cannot reach it easily, an HVAC tech can add a tee with a cleanout and an inline float near the unit. If your secondary pan looks like a rust lace doily, swap it for a new one with a proper drain and then add the switch. While you are at it, have the tech correct slope, add a proper trap, and secure the line so it is not sagging. Small improvements here pay dividends every summer.
Small But Mighty ROI
Ceiling leaks from condensate backups are sneaky because they are slow at first and hidden in insulation. By the time you notice the stain, you may have saturated drywall, compromised framing, and a warm, wet pocket where mold thrives. A condensate float switch costs what you spend on fast food. Pair it with a simple maintenance routine and you cut out 90 percent of the AC-related ceiling disasters we get called to handle every month. I am all for steady business, but I would rather you spend that money on a vacation than on my dehumidifiers.
FAQ
Do I need a condensate float switch if I have a secondary drain line?
Yes. A secondary drain line only helps if it is clear and routed where you will notice it. A condensate float switch shuts the system down before any pan overflows, even if both drains get overwhelmed or partially blocked. Redundancy is your friend.
Which style is best for stopping ceiling leaks?
If you have finished space below, a pan-mounted switch in the secondary pan is the most direct protection for your ceiling. Add an inline switch in the primary line if you want earlier detection. Many pros use both.
Can I test my overflow shutoff switch without tools?
Usually yes. Carefully lift the float by hand with the system running and listen for it to stop. Always be safe around moving parts and electricity. If it does not shut down, call a pro to check wiring and the switch itself.
Will a float switch fix a clogged drain?
No. It is a safety device, not a plumber. It stops water damage while you or a tech clears the clog, fixes the trap, or re-slopes the line. You still need to flush or vacuum the drain and correct the underlying issue.
What if my thermostat shows a safety or float switch error?
That usually means the float opened the circuit because water is high. Turn the system off, check the drain and pan, clear the clog, then reset the thermostat if needed. If the alert returns, get a technician to inspect for deeper problems.
How often should I clean the condensate drain?
At least once a year before cooling season. In hot, humid climates or with long runtime, do it mid-season too. A quick vinegar flush and a shop-vac pull at the exterior outlet go a long way.
Is installing a float switch a code requirement?
Where equipment is above finished spaces, most jurisdictions require either a secondary pan with a drain to a noticeable location, a float safety device, or both. Local rules vary, so check your code or ask a licensed HVAC contractor.