Aquariums, fountains, and indoor ponds bring calm energy into a home. They also introduce constant moisture, heavy weight, and plumbing points that can fail. A small drip under a stand can turn into swollen floors and mold inside wall cavities. This guide walks through smart placement, liner choices, safe plumbing design, routine checks, and fast action if water escapes. The goal is simple. Keep the water where it belongs, protect your floors and walls, and keep your fish and plants healthy.
Why water features can cause damage
Water rarely stays put once it finds a gap. It wicks into baseboards, flows under flooring, and seeps through screw holes. A slow leak can run for weeks before you notice the musty smell. Furniture stains. Laminate buckles. Drywall softens. The faster you control moisture the less your repair bill will be.
Weight is part of the risk. One gallon of water weighs about 8.34 pounds. That number climbs fast with gravel, rock, and a stand. If a tank sits on weak furniture or across unsupported joists the structure can sag and shift. Even a slight twist can stress silicone seams or bulkhead fittings. For a simple planning rule use the weight per gallon calculation to estimate total load, then check the floor capacity and stand rating. A helpful overview of weight per gallon can be found here aquarium weight per gallon.
If you ever walk into a wet floor, take quick steps to limit loss. Move valuables to high ground. Photograph what you see. Use towels to contain spreading water. For a deeper set of actions, including how to document damage and when a professional visit makes sense, see our guide to basement flooding tips and when to call a restoration pro.
Choose tanks and locations
Pick equipment that respects the realities of weight, moisture, and vibration. A purpose built aquarium stand distributes load to the floor far better than repurposed furniture. Particle board swells when wet. Vintage cabinets flex. A good stand stays level, sheds minor splashes, and lets you reach plumbing without drama. If you plan a large system consider the room structure. Joist direction matters. Proximity to a load bearing wall matters. A structural contractor or engineer can confirm whether your planned spot can support the total load without future sag.
Calculate weight with a safety margin
Start with the water calculation. Multiply tank volume by 8.34 to get water weight. Add gravel, rock, and decor. The sum usually adds a meaningful percentage. Add the stand weight as well. The total helps you size the stand and judge floor capacity. The Spruce provides a helpful reference on typical tank sizes and weights at aquarium weight per gallon. If the number gives you pause, pause the project. Change the location or downsize before you fill.
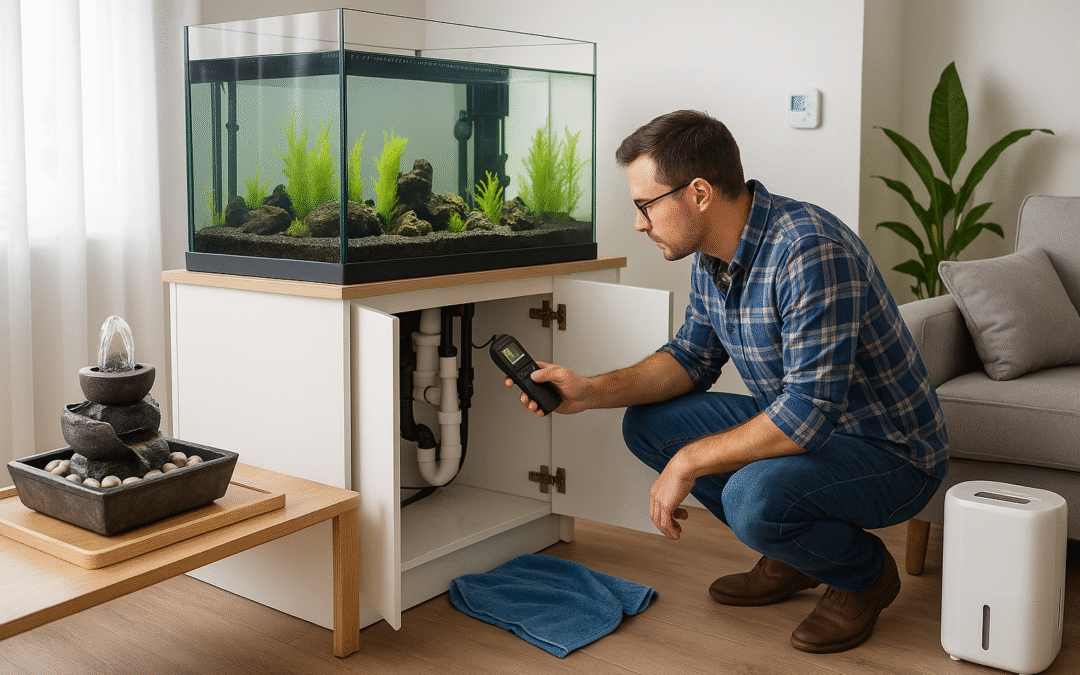
Place equipment with safety in mind
Keep the stand level. Use shims if the floor slopes. Avoid high traffic corners where a bump could shift plumbing or stress the glass. Leave space behind the stand for cables, hoses, and safe airflow. Keep power strips off the floor and use drip loops on every cord. If any outlet or power bar gets wet, stop using it. Review our guide to electrical safety after water damage before you set up lighting or pumps. Place electronics where splashes cannot reach them. Our tips on how to protect electronics from water and mold apply to aquariums and indoor fountains as well.
Liners for indoor ponds
Indoor ponds demand a liner that stays flexible and tough. The two most common flexible options are PVC and EPDM. PVC appeals due to cost. It tends to be less durable and more sensitive to temperature swings. EPDM has become a preferred choice for long life. It handles folding and reshaping well. It resists UV from windows and indoor lighting. It remains fish safe. A clear comparison can be found at HydroExperts EPDM pond liners vs PVC.
Use a geotextile underlayment beneath the liner to cushion against splinters or small stones. Avoid sharp edges on any shelf or step inside the pond. Round over wood framing that meets liner surfaces. Use protective pads where pumps or decor press against the liner. Run the liner up and over the pond rim with a smooth fold then secure the edge. Tuck and trim only after you confirm water level and splash pattern. If your pond integrates a window panel or a bottom drain, follow the bulkhead guidance in the next section before your final fill.
Plumbing and overflow design
Most aquarium water losses trace back to a failed fitting or a poor overflow plan. Good design limits the water that can escape during a malfunction. It also makes routine service easier which reduces human error over time.
Bulkhead best practices
Bulkheads join tanks or liners to pipes. The gasket belongs on the wet side. Both mating surfaces must be clean and free of sand or tape. Place the gasket against the flange, insert the fitting, then hand tighten the nut. Add only a small extra turn with a wrench. Over tightening can warp the gasket or crack a panel. After assembly, fill the system enough to cover the fitting and watch for weeping. A clear tutorial from ReefCo covers common mistakes and a simple test process at sealing aquarium bulkhead fittings. Small care during setup prevents many late night surprises.
Overflow and back siphon control
When the return pump stops, water in the overflow box and any water above the weir level will drain to the sump. Returns placed below the surface can also back siphon until they gulp air. Each gallon that drains must fit in the sump with room to spare. Design your system so that a normal power loss does not put water on the floor. Some hobbyists install a check valve. Others design the return to break siphon quickly with a shallow outlet or a small hole near the surface. Your sump volume matters more than any one gadget. ReefSump has a thoughtful writeup on choices and tradeoffs at preventing overflow and back siphon.
Float switches and leak alerts
A float switch turns a pump on or off based on water level. Many sump controllers accept one or more switches for redundancy. A vertical float switch can act as a high water alarm or a pump stop to prevent spillover. An example of a reliable style is shown at sump float switch and automatic control. Pair level control with a floor level leak sensor. Place one under the stand, one near the sump, and one by any external canister or chiller. Modern systems can ping your phone and, for some whole home models, shut off supply water to stop a running tap or auto fill. Tom’s Guide offers a helpful overview of options at water leak detectors and auto shutoff systems.
Routine maintenance checks
Good maintenance keeps small issues from growing. Make a quick visual check part of your weekly rhythm. Wipe the stand edges. Look under the sump for salt creep or puddles. Press a dry paper towel along the base of the tank trim to catch a faint line of moisture you may not see. Listen for gurgles that were not present last week. Pumps, hoses, and unions all speak through sound changes.
Once each month, inspect silicone seams with bright light. Look for bubbles within the seam, haze, or peeling edges. Discoloration at a corner warrants attention. If you notice bulging or gaps, plan a reseal or replacement. FishTankAdvisor offers helpful inspection tips and reseal guidance at inspect aquarium silicone seals. For older DIY tanks, a deeper inspection every few years reduces risk. Many hobbyists plan a major check at the five to ten year mark for aging silicone.
Quarterly checks should include a test of every float switch. Lift each float to confirm alarms and pump stops. Test every leak sensor by placing a damp cloth on its contacts. Tighten mechanical fittings with care. Turn a little at a time. Stop if a gasket starts to pinch. Confirm your sump can accept drain down volume by simulating a power loss. Watch the water line with the pump off. Confirm at least a small margin remains before the rim. If not, lower display water level or raise return outlets so they break siphon sooner. Add a bucket test for auto top off accuracy to avoid slow salt swings or spills.
For indoor ponds, walk the edges and lift coped stone or trim in a few spots to check liner condition. Inspect the underlayment where you can reach it. Look for wear spots near pump housings. Confirm that liner folds still sit smooth and that nothing sharp has shifted under weight.
Emergency steps for leaks
Speed and safety dictate outcomes when water reaches floors, outlets, or appliances. If you find a puddle around the stand or water on a lower level, treat it like any other household leak. Focus on three things. Stop the water. Protect people. Begin drying within the first day.
First, cut power to the affected area at the breaker if any outlet, bar, or cord looks wet. Do not handle plugs while standing in water. Read our guidance on electrical safety after water damage and call a licensed electrician if there is any doubt. Second, stop the source. Turn off return pumps. Close valves to external canisters. If a plumbing line feeds an auto top off or a water change station, shut the home supply valve. Third, move valuables and soft goods to a dry spot. Lift rugs. Slide plastic under furniture feet to prevent staining.
Containment comes next. Towels and a wet vac can save floors if you caught the leak early. If water reached wall cavities, ceiling spaces, or insulation, professional drying prevents hidden mold growth. Mold can begin after only one to two days in wet materials. The EPA explains this timeline and why moisture control is the core strategy at mold prevention and 24 to 48 hour drying window. For guidance on extraction and advanced drying equipment, see our article on professional water extraction and drying.
Document what you see as you work. Take photos of the source area, floor coverings, and any stained walls. Keep receipts for supplies and equipment rentals. Our basement flooding tips and when to call a restoration pro page expands on insurance photos, inventory lists, and next steps.
Prevent mold after leaks
Mold growth needs moisture and time. Reduce both and you protect your home and air quality. Dry the area within the first day whenever possible. Pull baseboards if the wall behind them is wet. Move air across damp surfaces. Run a dehumidifier in the room until materials return to normal moisture levels. Porous items like carpet padding and fiberboard swell and hold moisture. Those items often require replacement after a significant spill.
When a leak contacts outlets or runs down inside walls, call licensed trades and a restoration team. Wet drywall can hide moisture in the stud bay. Insulation traps water against wood. Fast drying with professional extraction and monitored dehumidification can prevent microbial growth. Learn more about the drying process in our guide to professional water extraction and drying. The EPA explains the short window for successful prevention at mold prevention and 24 to 48 hour drying window.
Recommended products
Smart gear gives you time to respond before a drip becomes a flood. Place at least one leak sensor under the stand where plumbing concentrates. Add a second near the sump and a third by any external canister or chiller. Choose a model that sends phone alerts. Whole home systems can also shut off supply water which is useful for auto top offs and water change stations. Tom’s Guide provides a helpful overview of options at water leak detectors and auto shutoff systems.
Use float switches on critical levels. One switch can stop a return pump before the sump overflows. Another can halt a top off pump when the display rises too high. A third can trigger a siren on a high water event. Look for corrosion resistant designs and protect wiring with drip loops. A common style is shown here sump float switch and automatic control.
For indoor ponds, EPDM liner with a proper underlayment gives you forgiveness during build and service. It handles folds without cracking. It stays pliable over many seasons. Read the material comparison at EPDM pond liners vs PVC to help guide selection.
Homeowner checklist
Keep this short list handy as you plan and maintain your system.
- Before you set up, calculate filled tank weight with water, gravel, and decor. Position large tanks near a load bearing wall and use a rated stand. Reference weights at aquarium weight per gallon.
- For indoor ponds, pick EPDM with a geotextile underlay. Round any sharp wood or stone edges. See EPDM pond liners vs PVC for details.
- Install bulkheads with the gasket on the wet side. Hand tighten, then a small wrench turn. Leak test before a full fill. Review sealing aquarium bulkhead fittings.
- Set sump volume to accept drain down from a power loss. Place returns shallow or add a small siphon break hole. Read about preventing overflow and back siphon.
- Test leak sensors and float switches every few months. Add at least one sensor under the stand and one by the sump. Review options at water leak detectors and auto shutoff systems.
- Run monthly seam inspections with bright light. Look for bubbling, haze, or peeling. Guidance at inspect aquarium silicone seals.
- Keep cords off the floor with drip loops. If any outlet gets wet, stop using it and review electrical safety after water damage.
FAQs
How fast can mold grow after an aquarium leak
Mold can begin within one to two days on wet materials. Dry the area right away. The EPA explains the timeline in its guide at mold prevention and 24 to 48 hour drying window.
How much does a filled aquarium weigh
Water weighs about 8.34 pounds per gallon. Add gravel, decor, glass, and the stand. Use that sum to pick a stand and a placement that can handle the load. See aquarium weight per gallon for common sizes.
What liner is best for an indoor pond
EPDM offers durability and flexibility with good lifespan in indoor settings. PVC costs less but tends to wear faster. A side by side view is available at EPDM pond liners vs PVC.
Do I need a check valve or float switch on my sump
A reliable design uses a sump sized to accept drain down volume and return outlets that break siphon quickly. A check valve can help in some builds but should not be your only safeguard. Float switches and leak alarms add redundancy. Read more at preventing overflow and back siphon and see a typical switch style at sump float switch and automatic control.
How often should I inspect aquarium seals
Do a quick visual check each month. Plan a deeper inspection and possible reseal on older tanks in the five to ten year range. Inspection tips are collected at inspect aquarium silicone seals.
Placement tips that save floors
Think about spill paths during the layout stage. Set buckets and water change gear on waterproof mats. Keep towels and a small wet vac nearby. Place a tray under the skimmer section if you have one. Soft silicone tubing can slip off barbs when it ages. Add clamps where needed and replace cloudy tubing before it becomes brittle. Use unions on external plumbing so you can service a pump without twisting a bulkhead. Label valves so anyone can shut down the system in a pinch. Clear labels matter if a neighbor or family member responds when you are away.
Vibration affects fittings over time. Pads under pumps reduce vibration. Hard pipe secured to the stand resists sway. Hoses that hang freely put constant stress on barbs and fittings. Support them with clips. Check that your stand sits flat on the floor. Wedges under one foot can twist the frame which transfers to the tank. A small level and a few hardwood shims can fix that before you fill.
Care for electronics near water
Water and electricity never mix well. Keep power strips off the floor. Mount them on the inside wall of the stand with enough slack for drip loops. Use ground fault protected outlets where possible. If any cord, power bar, or outlet has been in contact with water, stop using it and call a licensed electrician. Our electrical safety after water damage guide covers the basics. Keep controllers and battery backups in ventilated spaces. Heat builds up in closed cabinets. Use vents or low power fans to move air.
Many fish keepers place a small sensor beside sensitive gear. Leak alarms cost little and buy peace of mind. Whole home systems add protection for other rooms as well. They can detect a dishwasher leak, a washing machine failure, or a burst line in winter. Tom’s Guide has a balanced look at choices at water leak detectors and auto shutoff systems.
When to call a pro
Some spills are simple. A half cup on tile is a towel job. Other events call for trained help. If water soaks carpet and pad, runs under baseboards, or drips into a ceiling below, involve a restoration team. Professional extraction removes water that a shop vac cannot reach. Targeted dehumidification pulls moisture back out of wood and drywall. Fast action keeps mold from taking hold during the first two days. Learn what to expect in our guide to professional water extraction and drying. If the leak involved outlets or the service panel, call an electrician before restoring power. See our safety notes at electrical safety after water damage.
A simple plan that prevents headaches
Pick the right spot with a stand that can carry the load. Use EPDM for indoor ponds with a soft underlay to guard against punctures. Install bulkheads with clean surfaces and gentle torque. Size your sump for safe drain down. Place float switches and leak sensors where they will catch trouble first. Inspect silicone monthly. Test alarms and switches a few times each year. Act fast if you see moisture on floors or walls. Dry within the first day whenever possible. The EPA guide at mold prevention and 24 to 48 hour drying window sums up why that window matters so much.
If you have a leak now or you want a safety review before you set up a new system, we can help. Reach out for professional water extraction and drying or ask for an inspection through our contact options. Our team is ready to respond, protect your home, and get you back to enjoying the calm that water features bring.