If there’s a puddle forming under your water softener, that’s not a harmless little splash party. It’s often salty water sneaking under your slab, feeding mold, wrecking flooring, and quietly chewing at concrete. Brine is corrosive, and slow leaks can turn garages and utility rooms into moisture farms. The good news is you can stop most leaks with a few easy checks. This guide shows you how brine tanks overflow, the silent ways softeners leak, and the setup and maintenance that actually protect your slab. We’ll hit brine tank overflow prevention head-on while calling out the signs of hidden slab moisture damage you don’t want to miss.
How Does A Brine Tank Work?
Your water softener’s brine tank is the salt vault. During regeneration, water flows into this tank to make brine, then the system draws that salty water through the resin to flush out hardness minerals. Afterwards, the tank refills to a preset level. Two key parts make this work without flooding the place: the float assembly that stops the brine tank from filling too high and a drain system that carries spent water to a proper discharge. When either side misbehaves, salty water can climb, spill, and find every crack in your slab.
Sneaky Leak Causes
Softener leaks don’t always look like a dramatic gush. More often, you get slow weeping around fittings, failed seals, or a brine tank that fills higher than it should until it finally overflows. Here’s what usually goes wrong.
Salt bridging. High humidity, cheap salt, or overfilling the tank can fuse crystals together into a crusty shelf that sits above a pocket of empty space. Water can’t reach the salt below, so the system fails to make proper brine, cycles get weird, and you can see strange fill levels or overflow symptoms. A related issue is a salt mushing layer at the bottom that clogs pickup points like wet concrete.
Clogged brine or drain lines. Kinks, slime buildup, or salt sludge can choke flow. If the control head tries to fill or draw and the line is obstructed, the brine tank may keep rising. A partially blocked drain also backs up regeneration water, which can show up as an overflow or seepage where you can’t see it.
Faulty float or overflow valve. The float assembly is supposed to shut off water at a safe height. When the float sticks, is set too high, or the fitting is loose, the tank can overfill. Some tanks have an overflow elbow meant for a safety hose. If it isn’t piped to a drain, the first overflow becomes a brine river across your floor.
Cracked brine tank or resin tank. Brine tanks can split from age, impact, or freeze-thaw stress in garages. Resin tanks can develop cracks or seep at the base or at the control head o-rings. Even a pinhole leak can keep a slab damp for months.
Failing control or rotor valves. Worn seals in the control head let water slip where it shouldn’t. You might hear the unit cycling at odd times or see the brine level drifting higher than normal between regenerations. That drift means extra water in your brine tank and a higher chance of overflow.
Why Slab Damage Goes Hidden
Garages and utility rooms are pros at hiding slow leaks. Concrete wicks moisture. Water can migrate across the slab surface or through tiny cracks, then vanish under base plates, cabinets, or stored boxes. Salty water leaves a tell-tale crust called efflorescence, but it often shows up later. In the meantime, humidity builds, baseboards stain, and mold gets comfy at floor level.
Under vinyl or laminate, moisture balloons planks and curls edges. In a garage, you may notice darker concrete around the softener after each regeneration cycle. Long-term seepage can weaken adhesives, rust nearby equipment, and deteriorate the bottom of drywall. If you want a quick primer on how hidden leaks cause outsized damage, take a look at our take on the sneaky spots water hides: Hidden Water Leaks.
Brine Tank Overflow Prevention
Let’s make brine tank overflow prevention simple: give excess water a safe exit, keep the float honest, and make sure the drain can actually drain. Start by confirming your brine tank has an overflow elbow near the top. That elbow should be connected to a separate overflow hose that runs to a floor drain or standpipe with a proper air gap. Do not tee it into the main softener drain line. If the main drain clogs, your overflow won’t help at all.
Next, look at the float. The float height should shut off water before it gets near the overflow elbow. If your float is gummed up with salt or set sky-high, tweak it back to the manufacturer’s spec and clean the assembly. Finally, follow the drain line from the control head to the discharge. Eliminate kinks, avoid long uphill runs, and make sure the end is not shoved down into a trap where it can siphon or plug with debris.
Setup Tips That Stop Overflows
Correct installation is half the battle. A softener that is sized right, ventilated, and drained properly is far less likely to decorate your slab with salty puddles.
Use a proper overflow line. If your brine tank has an overflow port, connect it to a separate hose and route it to a drain with an air gap. Keep that hose visible so you can see if it ever runs. If your tank doesn’t have an overflow, consider a retrofit kit or a catch pan with a drain.
Give the main drain an air gap. The primary drain line from the control head should discharge over a floor drain, standpipe, or air-gap device. This prevents backflow and reduces the risk of sewage odor or contamination sneaking back into your softener.
Right-size the softener. Undersized units regenerate too often, which means more fill cycles and more chances to overflow when anything is slightly off. Oversized units can create stale brine and salt mushing. Match your grain capacity to household use and hardness so regeneration is steady and predictable.
Control humidity. Salt bridges love damp rooms. If your softener lives in a sweaty garage or a tight utility closet, add ventilation or a small dehumidifier. Keep the brine tank lid closed and avoid filling salt beyond two-thirds. Dry air and partial fills cut bridge risk in a big way.
Choose the right salt. Clean solar crystals or pellet salt typically cause fewer issues than cheap rock salt loaded with impurities. If you see sludge or mush at the bottom of the tank, swap brands and clean the tank before refilling.
Plan for cold snaps. In unconditioned spaces, insulate or heat-trace the brine and drain lines. Frozen lines can block flow and bounce water right back into your tank.
Maintenance That Actually Works
Set a calendar reminder. A softener that gets even basic maintenance is far less likely to surprise you with a brine slip-and-slide.
Check the float assembly yearly. Lift the float and confirm it moves freely and shuts off flow. Clean the tube and float with warm water. Tighten the brine line fitting to the float head if it feels loose.
Break salt bridges gently. Tap a broom handle around the inside of the brine tank and push down lightly to confirm the salt is loose, not forming a hollow shelf. If you hit hard crust, carefully break it up and remove the chunks. If the tank is a mess of mush, scoop it out, rinse the tank, and start fresh with quality salt.
Clean the injector and venturi. Many control heads use a venturi or injector to pull brine. If it clogs with iron or debris, brine draw stumbles and you get odd fill levels. Shut off water, depressurize, and clean per the manufacturer’s instructions.
Inspect drain and brine lines. Look for kinks, crushed sections behind the unit, or algae buildup. Replace hardened tubing and reroute lines to avoid sharp bends. Keep runs short with smooth downhill paths where possible.
Watch for hairline cracks. Examine the brine tank, resin tank base, and control head connection. Hairline fractures around fittings often weep slowly. If your unit sits on a concrete curb, check the rim for salty tracks or dampness.
Run a test regeneration. After maintenance, trigger a manual regen while you’re around to watch. Mark the brine level with tape before the cycle, then confirm it rises, draws down, and refills to the normal set point. If the refill rises too high, adjust the float or troubleshoot the valve.
Monitor the floor. Slide a dry paper towel or a moisture meter under the edge of the softener cabinet and along slab joints nearby. If towels keep coming up damp, you’ve got seepage you need to address.
Safeguards And Emergency Moves
Even a well-kept softener deserves backup. A few low-cost safeguards can save your slab when a float sticks at 2 a.m.
Drop a leak sensor under the unit. WiFi leak detectors chirp your phone when they get wet. Place one under the brine tank and another along the slab joint where water would run. Bonus points if your sensor can trigger a shutoff valve.
Use a catch pan with a drain. A low-profile pan sized to your softener, piped to a floor drain, turns a surprise overflow into a non-event. If a drain isn’t possible, add a pan plus a leak sensor so you get an alert in time to act.
Add a float switch shutoff. Inline shutoff devices tied to a float or leak sensor stop the water feed when they detect trouble. These are popular for water heaters and work nicely with softeners too.
Seal penetrations and edges. Where pipes punch through the slab or wall, seal gaps with polyurethane sealant so water can’t disappear behind finishes. In garages, consider an epoxy or polyurethane floor coating around the utility corner. It helps water move to a drain instead of soaking into the concrete. If you’re renovating, moisture-tolerant materials help a lot. Here’s our rundown on products that resist mold: Building Materials That Prevent Mold Growth.
Raise the unit off the floor. A small concrete or composite curb makes leaks easier to spot and keeps the base out of minor puddles.
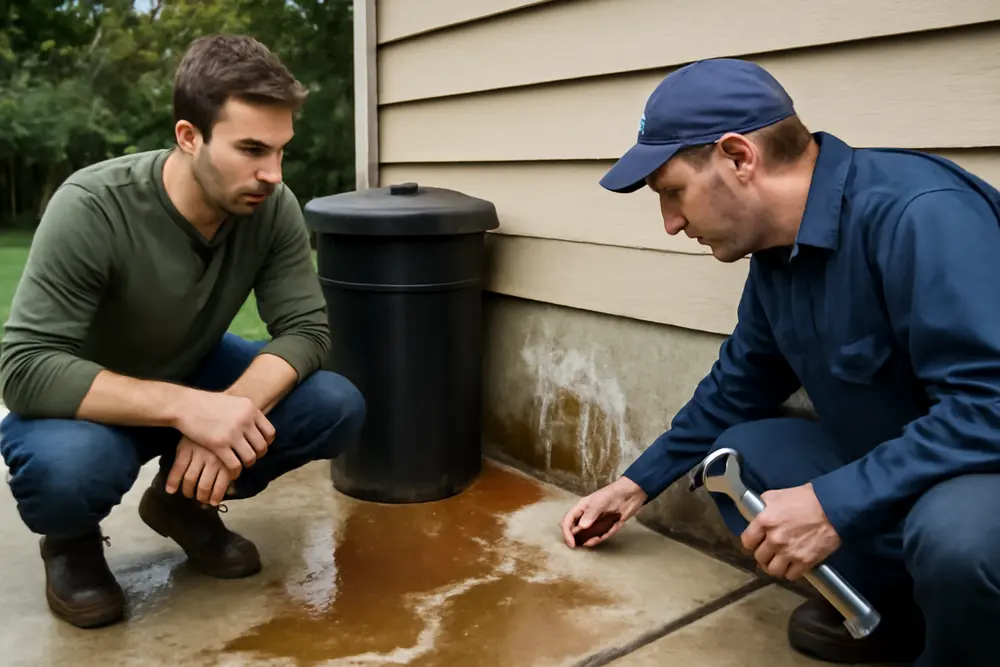
Signs Your Slab Is In Trouble
Hidden slab moisture damage rarely announces itself with trumpets. It shows up in small, annoying, expensive ways that escalate if you ignore them.
Watch for a salty ring on concrete around the brine tank or along slab joints. Efflorescence looks like white powder or crust. It’s the mineral calling card of repeated wetting and drying. Check baseboards for swelling or staining at the bottom edge, and sniff for that musty locker-room smell at floor level near the softener. If laminate flooring lives nearby, look for cupping, tenting, or soft spots. Cabinets can warp or delaminate on the toe-kick before the face shows damage. Metal toolboxes or water heater stands will grow rust freckles along the bottom. A moisture meter reading that stays high after a few dry days means your slab is acting like a wet sponge.
In garages, you might see hairline slab cracks that darken and lighten with the softener’s regeneration schedule. That pattern is a big clue. Ants love damp expands-too-long spots. If they’re throwing a party near your softener, follow their trail.
Quick Case: The Softener That Soaked A Slab
A homeowner noticed a small wet arc under the brine tank every few days. The float was sticky and the overflow elbow was uncapped with no hose. The drain line had a kink tucked behind the water heater. After a few weeks, the bottom of the drywall behind the softener went soft and the garage slab showed a chalky halo. We cleaned and reset the float, replaced the kinked drain line, plumbed the overflow to a floor drain with an air gap, and added a catch pan with a leak sensor. We cut out a 2-foot section of damaged drywall, treated the base plate, and dried the slab until readings normalized. Total hardware fix was minor compared to the building repairs. That’s the economy of doing the install and maintenance right the first time.
When Should You Call A Pro?
If your softener overflows more than once, the brine level never drops during regeneration, or you see ongoing dampness around the slab, it’s time to bring in help. Valve assemblies, injectors, and seal kits are routine for a technician. If you’re spotting mold, persistent efflorescence, or floor warping, call a restoration team before demolition becomes the only option. We handle the dry-out, cleaning, and rebuild when salty water has already done its worst. If you want to see how we approach water damage step by step, here’s our process: Water Damage Restoration.
Here’s a quick way to stop an active overflow while you wait: close the softener’s bypass valves to cut water to the unit, unplug the control head, and use a wet vacuum to lower the brine level below the float. Keep the area ventilated, pull boxes or anything absorbent off the floor, and place fans to move air across the wet slab. Do not dump brine onto landscaping. That salty cocktail is plant kryptonite. Discharge to a drain that can handle it.
If you’re in prevention mode, spend 10 minutes today on a fast check. Confirm the overflow elbow has a hose to a drain. Move the brine float freely with your hand. Straighten the drain line and make sure it discharges with an air gap. Peek under the unit with a flashlight. If you catch a problem now, you won’t be budgeting for drywall, baseboards, and flooring later. That’s how you protect against hidden slab moisture damage without breaking a sweat.