You can do everything right with your roof, then a tiny missing piece at the roof-wall joint quietly funnels rain straight behind your stucco. Months later, you notice a bulge, a stain, maybe a musty smell. By then, the sheathing is mush, the studs are speckled with mold, and your wallet is on a weight loss plan it didn’t sign up for. The hero you need is kickout flashing. It’s small, shaped like a scoop, and it keeps water in the gutter where it belongs. If you own a stucco home, this little diverter is the most underappreciated upgrade for real Stucco Rot Prevention.
What Is Kickout Flashing?
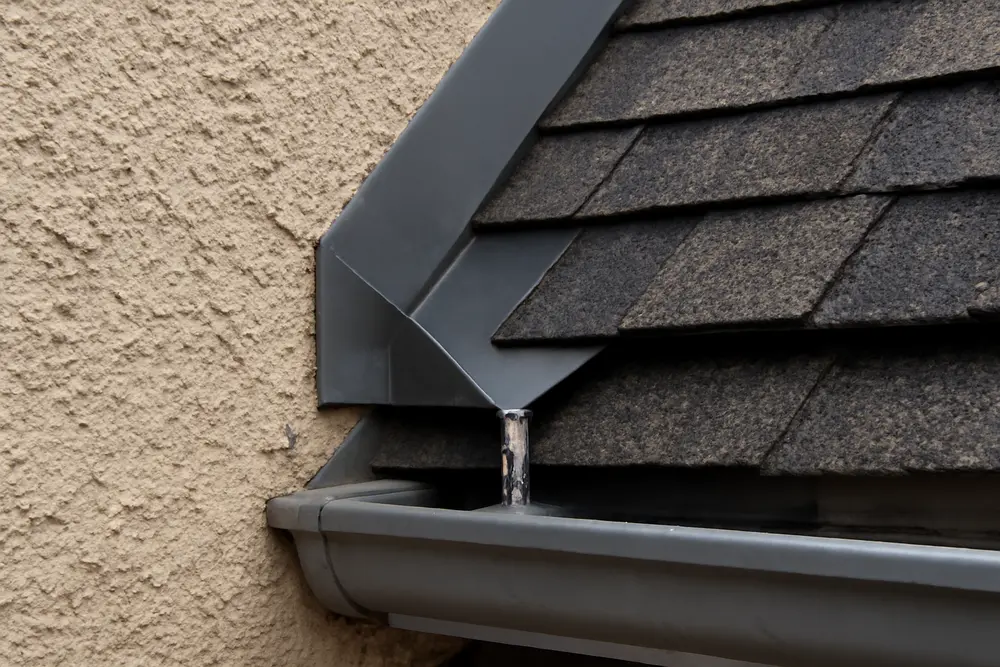
Kickout flashing is a preformed diverter that sits at the bottom end of a roof-wall intersection where the shingles meet a vertical wall. Think of it as the last piece in the step-flashing chain that gives the roof water a hard nudge into the gutter instead of letting it hug the wall. Rainwater has a habit of clinging to surfaces and following the path of least resistance. Without a kickout, that path is often right behind the siding or stucco.
Here’s how it’s supposed to work. Step flashing is layered with each shingle along the wall. A water-resistive barrier, or WRB, is lapped correctly over that flashing on the wall side. At the lower end, the kickout flashing collects the flow from the last step flashing and kicks it into the gutter. When the system is sized and integrated properly, it’s like a conveyor belt for water that deposits every drop in the gutter. When anything in that sequence is missing or misinstalled, water goes sightseeing inside your wall. For technical guides that show the proper sequencing, the Building America Solution Center has solid illustrations and details you can share with your contractor: step and kickout flashing and retrofits at roof-wall intersections.
Why Missing Pieces Rot Stucco
Water is patient and petty. At the spot where a sloped roof runs into a wall, runoff accelerates and splashes. Wind pushes it sideways. Surface tension pulls it around the edges. Capillary action can draw it behind the cladding. If the kickout flashing is missing, undersized, or trapped behind the gutter instead of feeding into it, water will run down the wall face, slip behind the stucco or siding, and soak the sheathing. Stucco doesn’t leak like a faucet. It leaks like a slow drip, which is worse. The surface can look fine while the OSB or plywood behind it turns to oatmeal.
What happens next reads like a restoration shop’s greatest hits. Damp sheathing loses structural strength. Framing picks up mold. Insulation stays wet and quits doing its job. Fasteners corrode. Paint bubbles. On the exterior, you might see hairline cracks and staining that look cosmetic. On the interior, you might get baseboard swelling and a musty smell. If you live where rain comes sideways or snow piles up against walls, the risk goes up. The fix almost always costs more than installing a proper kickout would have in the first place.
We also see plenty of botched installs. Field-bent diverters that are too small. Non-corrosion-resistant metal that pits and opens up. Kickouts slipped behind the gutter instead of feeding into it. Flashing that isn’t integrated with the house wrap. Caulk is doing the job of metal. These are invitations to water. They might look decent from the ground, but when we open the wall, the damage tells the truth. InterNACHI has an inspector’s overview for what’s right versus wrong that’s worth a look: inspecting step and kickout flashing.
What Codes And Pros Require
The International Residential Code calls for step flashing and a diverter at the bottom of roof-wall intersections to shove water away from the wall and into a gutter. If you’re using metal, it needs to be corrosion-resistant and typically at least 0.019 inches thick, which is 26-gauge galvanized steel. Flashing should extend at least 4 inches up the wall and 4 inches onto the roof deck. The diverter needs to be big enough and angled to actually toss water into the gutter, not splash it onto the wall.
Best practice goes beyond the letter of the code. Pros integrate the kickout behind the cladding and under the shingles with shingle-style layering so every layer laps the one below. The WRB on the wall is lapped over the top leg of the flashing. The gutter is set so the diverter feeds into it with a clean path. If you’re working with stucco or EIFS, the assembly needs a drainage gap so incidental water can exit instead of getting trapped. You’ll find the Building America Solution Center’s details on materials, sizes, and lapping sequences helpful: roof-wall flashing requirements.
Can You Spot Trouble From The Ground?
You don’t need to climb a ladder to get suspicious, and I’d prefer you didn’t unless you’re comfortable with heights. Start with the area where the roof edge hits a wall and feeds into a gutter. If there’s no obvious diverter at the end of the step flashing, put a pin in that. If the diverter is there but looks tiny or buried behind the gutter, that’s another red flag. Then scan the wall below.
Surface Clues You Can See
Look for vertical brown or green streaks on stucco or siding under the roof-wall junction. Algae loves a consistent water path. Peeling or bubbling paint and hairline cracks that map out a wet area are also classic. Bulges, soft spots, or warped siding planks under that corner are a tell that moisture is stacking up behind the cladding. If you can reach the area safely, press gently on the surface. Mushy isn’t a good sign.
Gutters, Roof Edges, And Trim
If the gutter is dented, undersized, or clogged right at the intersection, water will splash out no matter how good the kickout is. Check the fascia and soffit for staining or rot at that corner. A rotting fascia behind the gutter is often a symptom that water is not being captured properly. If you see a step flashing exposed but no kickout at the bottom, assume water is washing that wall every time it rains.
Interior Hints
Inside the house, look at the baseboards and drywall near the companion wall. Staining at the ceiling corner where that roof line passes through is another clue. A musty odor in a closet tucked into that corner makes my spidey sense tingle. None of these is proof, but together they’re a strong case to investigate before rot sets in.
Retrofit That Actually Works
Retrofitting kickout flashing on an existing home is not “just slap it on.” The diverter can’t do its job if it isn’t tied into the layers of roofing and wall waterproofing. Done right, a retrofit means opening up enough stucco or siding to slip the flashing behind the cladding and under the shingles. That lets you re-establish proper laps with the WRB and step flashing so water sheds out and away. Prefabricated kickout flashings are better than field-bent ones because joints and corners are weak points. The fewer seams, the better. There are good deep-scoop PVC and metal options that move water cleanly into the gutter.
Retrofit For Stucco
For stucco, we cut back the finish and lath near the bottom of the roof-wall intersection to expose the sheathing and WRB. If the sheathing is rotten, we remove it, treat mold where needed, and rebuild the wall layers. We install the kickout under the last shingle, tie it into fresh step flashing, and lap the WRB over the wall leg of the flashing. Then we rebuild the stucco assembly with a drainage space so any incidental moisture has an exit path. The stucco finish is patched and blended. The key is tie-in, not just appearances. A painted piece of metal stuck on the outside will leak the first time wind-driven rain arrives.
Retrofit For Siding
For lap siding, we pull the lower courses at the intersection, set the kickout under the shingles and over the house wrap, then reinstall siding with the required clearance above the roof surface. That gap matters. Siding should sit roughly 3/4 to 1 1/2 inches above the shingles so water can flow freely and the flashing is visible. Tight siding looks clean, but it traps water and wicks it into the wall. With vinyl, you’ll often need trim components designed to work with the diverter so you don’t pinch the water path.
Materials That Last
Use corrosion-resistant metal at 0.019 inches minimum or a quality UV-stable PVC kickout designed for roofing. Match materials so they don’t fight each other. Aluminum against copper is a corrosion romance you don’t want. Stainless and galvanized fasteners are your friends. Seal transitions with compatible sealants, but don’t try to use caulk as a substitute for metal overlaps. Caulk ages and cracks. Laps and shingle-style layering should do the real work. For a clear retrofit sequence, the Building America Solution Center’s existing-home guide is excellent: flashing roof-wall intersections.
Maintenance That Keeps Walls Dry
You don’t need a binder of chores. Keep it simple and regular. After big rains, take a look at the roof-wall junctions from the ground. If you see streaks forming on the wall, deal with them. Keep gutters clean, so the kickout actually has somewhere to send water. If a painter tells you they’re going to caulk that little flashing to make it look cleaner, stop them. You want a free and clear path into the gutter. When you replace a roof, make kickout flashing part of the scope in writing. If you’re adding a new wall, dormer, or deck roof, plan the diverter detail before anyone swings a hammer.
Watch clearances. Stucco and siding should not rest on shingles. That small gap matters. If snow slides off your roof into a corner, consider snow guards or a deeper diverter shape to manage spring melt. And if you live near salty air, be picky about metal type. Stainless or heavy galvanized performs much longer than thin painted tin.
Cost Now Vs Damage Later
I get it. No one wakes up excited to buy an obscure piece of flashing. But the cost math is brutal in a good way. Installing or upgrading kickout flashing during re-roofing is a rounding error in the total. Retrofitting a proper diverter with minor cladding work is still cheap compared to chasing rot through a wall cavity. Skip it, and you might be paying for sheathing replacement, framing repairs, mold remediation, and full stucco tear-out and rebuild.
| Item | Typical Cost Range | What Affects Cost |
|---|---|---|
| New kickout flashing during re-roof | $75 – $250 per location | Material choice, gutter coordination, and roof pitch |
| Retrofit kickout on siding | $300 – $900 per location | Access, siding type, minor sheathing patching |
| Retrofit kickout on stucco | $600 – $1,800 per location | Stucco cut-back, lath repair, finish blending |
| Wall rot repair behind stucco | $2,000 – $10,000+ | Extent of rot, mold treatment, and structural repairs |
| Full stucco tear-off and rebuild | $15,000 – $40,000+ | Home size, assemblies, scaffolding, finishes |
Regional costs vary, but the pattern doesn’t. A $200 piece of flashing can save a $20,000 wall. If your house has multiple roof-wall intersections, address them in one visit to reduce labor time and staging.
Quick Homeowner Checklist
If you want a simple plan for Stucco Rot Prevention at these tricky joints, here’s the short version you can run every season and after storms:
- Stand on the ground and confirm you can see a kickout where the roof edges meet the walls.
- Make sure the diverter feeds into, not behind, the gutter.
- Scan the wall below for stains, bulges, or algae trails.
- Check inside corners for baseboard swelling or musty odors.
- Keep gutters clean and sized right for your roof area.
- Maintain a visible gap between siding or stucco and shingles.
FAQ: Kickout Flashing?
Is kickout flashing really required?
Yes. Modern codes require diverters at roof-wall intersections because field failures taught the industry a costly lesson. Enforcement varies, but the physics don’t. If water can ride the wall, it will. Install it regardless of what a past contractor skipped.
Can I just caulk the corner instead?
No. Caulk is a short-term bandage that moves, shrinks, and fails. Water needs a clear, durable path. Metal or PVC diverters that are layered under shingles and behind cladding do the actual work. Caulk belongs at controlled joints, not as the primary water management plan.
How big should the kickout be?
Larger than you think. A deep scoop that projects water cleanly into the gutter is the goal. Many pros prefer preformed kickouts with a tall wall leg and a generous outward throw. Generic bent tin triangles usually aren’t enough, especially in heavy rain or on steep roofs.
What materials are best?
Corrosion-resistant metals like galvanized steel at 26 gauge minimum, stainless steel where budgets allow, or UV-stable PVC diverters designed for roofing. Match fasteners and avoid dissimilar metal contact that can corrode. If you’re coastal, lean toward stainless or heavy galvanized.
Does stucco need special detailing?
Yes. You want a drainage space so any water that gets behind the stucco can exit. That means proper WRB layering, weep screeds where required, and a clean path for the kickout to feed the gutter. Skipping the drainage space traps water and accelerates rot.
Can I install a kickout without removing cladding?
There are surface-mount diverters sold as quick fixes, but they rarely integrate well. If you want reliable protection, you need to tie into the roofing and WRB layers. That usually means removing some cladding and a few shingles at the intersection.
What about snow and ice?
In cold climates, snow melt can overwhelm small diverters. Choose a deeper kickout and make sure the gutter stays open. If ice dams are common, consider upstream fixes like air sealing and insulation improvements to cut melt cycles.
When should I call a pro?
If you see staining, bulging, or you can’t positively identify a stout kickout feeding your gutter, get an inspection. Also call in help if your cladding is stucco or EIFS, if the roof is steep, or if there’s any sign of interior moisture. A targeted moisture meter check can save you from opening the wrong area.
Need A Kickout Flashing Check?
If you’re looking up at a roof-wall corner and squinting, that’s your sign. Our crew installs properly sized kickout flashing, ties it into the roof and wall layers, and fixes hidden moisture damage before it spreads. We’re happy to start with a ground-level inspection and a hose test if needed. If we find soft sheathing behind that stucco, we’ll show you exactly what failed and how to rebuild it so it stays dry. Kickout flashing is small, cheap, and mercilessly effective. If you want real Stucco Rot Prevention, this is where you start.