If mold cleanup were a boxing match, negative air pressure containment would be the ropes that keep the fight inside the ring. When you’re tearing out moldy drywall, grinding framing, or HEPA vacuuming everything that isn’t nailed down, the number one goal is simple: stop spores from hitching a ride to the clean parts of your home. This guide breaks down how pros actually lock down a work area using sealed barriers, HEPA air scrubbers, and pressure differential monitoring, plus a few simple checks you can do to confirm the setup isn’t just for show.
What Is Negative Air Containment?
Negative air containment is the controlled setup that makes the work zone slightly lower in air pressure than the surrounding areas. Air wants to move from high pressure to low pressure, so when doors open or workers go in and out, clean air flows into the containment and dirty air stays put. No mystery here: you create a pressure drop with a HEPA-filtered negative air machine that pulls air from the work zone and exhausts it out of the building. The result is a steady inward draw that blocks cross-contamination while mold remediation is happening.
There are three core pieces to the system working the way it’s supposed to:
First, sealed barriers. Think floor-to-ceiling plastic walls with tight seams, double layers in sensitive areas, and a zip-door for access. Second, HEPA air scrubbers or negative air machines that actually move air and capture fine particles down to 0.3 microns. Third, pressure differential monitoring, which is the boring-but-critical part where we confirm the pressure drop is real and steady. Pros insist on all three because indoor air quality, insurance requirements, and clearance testing depend on containment doing its job. The EPA’s mold guidance and industry standards like IICRC S520 outline when and how to use limited or full containment so demolition dust and spores don’t end up everywhere you sleep, eat, and breathe.
The Gear That Makes It Work
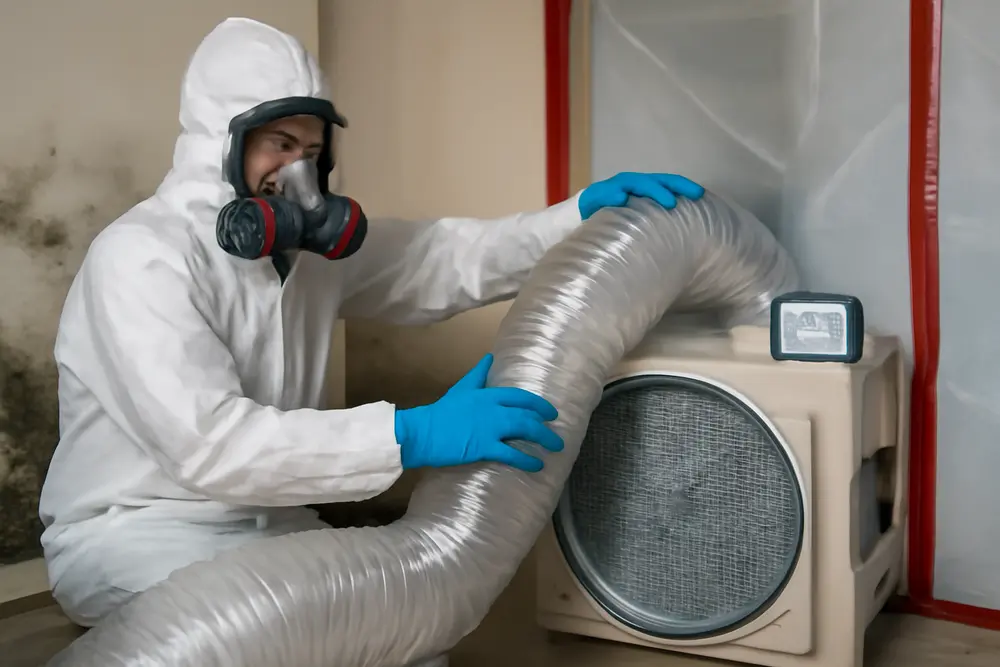
Sealed Barriers
Good containment starts with good poly. We install full-height barriers using 6 mil polyethylene sheeting, often in two layers. Seams are overlapped and taped on both sides. We add framed openings with zip-doors so techs can move in and out without dragging contaminants. Any penetrations in the envelope get sealed tight: electrical outlets, plumbing chases, recessed lights, and especially HVAC supply and return vents. If air can slip through a crack, spores will follow it. In areas with drop ceilings, the ceiling plane gets sealed as well so the plenum isn’t a giant escape route.
HEPA Air Scrubbers And Negative Air Machines
Next up is the muscle that moves air. HEPA scrubbers pull contaminated air through filters rated to capture 99.97 percent of particles at 0.3 microns. When we duct the discharge to the exterior, the unit becomes a negative air machine and creates the pressure drop that keeps everything flowing in the right direction. The exhaust should never be ducted into a hallway or another room. Exterior discharge is the standard, and the duct run needs to be as straight and short as practical to maintain airflow. Capacity matters too. Undersized machines can’t maintain negative pressure when demolition kicks up dust. Many techs size for a target number of air changes per hour in the containment zone and adjust as work intensifies.
Pressure Differential Monitoring
This is where you trade guesswork for numbers. We use differential manometers that display the real-time pressure difference between the work zone and adjacent spaces. For mold remediation, a typical target is at least 0.02 inches of water column, which is roughly 5 Pascals. That threshold aligns with guidance like the Minnesota Department of Health’s remediation recommendations for negative pressure in schools and public buildings and is echoed across many industry resources. If the needle drifts above zero or bounces around during active work, we tune the system, check for gaps, or upsize the equipment. No numbers, no proof.
Standards And Proof It Works
The EPA lays out size-based containment levels: up to about 10 square feet of affected material is usually small, between 10 and 100 square feet often calls for limited containment, and more than 100 square feet typically gets full containment with negative air pressure. You can read the agency’s training chapter on containment and negative pressure right here: EPA Mold Course Chapter 6.
On the numbers side, many programs and consultants look for a minimum pressure differential of 0.02 inches of water column, around 5 Pascals. The Minnesota guidance on remediation in schools references 5 Pa as a minimum for negative pressure, with continuous monitoring and logs to demonstrate control. You can see that reference here: Minnesota Department of Health. Industry explainers like National Mold Authority also describe practical thresholds in the 0.02 to 0.05 inches of water column range for containment stability.
Want a quick non-technical check while the machines are running? Look at the plastic. It should billow inward toward the work zone, not puff outward. A zip-door should pull gently closed on its own. If the barriers flutter or bulge the wrong way, something’s off. These are not substitutes for measurements, but they’re great sanity checks when you’re standing in the hallway watching the work.
When Do You Need Containment?
Containment with negative pressure is required when the risk of spreading contaminants is high. That includes projects with visible mold over about 10 square feet, demolition that disturbs moldy building materials, or any work near HVAC returns, shared ventilation, or open pathways to occupied rooms. For larger areas over 100 square feet, full containment with negative air pressure is the norm according to the EPA. Multi-room contamination, apartments or condos with shared corridors, and homes where people are staying in place during remediation all raise the bar for tighter controls. Insurance adjusters and third-party consultants often require documented containment and pressure logs before they’ll sign off on clearance testing.
We also look at building physics. If the work area is near a stack effect path like an open stairwell, spores have an escalator straight to the second floor. If the project involves grinding or sanding, particle loads spike and so does the chance of spread. In other words, containment isn’t just a plastic curtain for the camera. It’s a pressure-controlled box sized for the job at hand.
Setup Process That Pros Follow
Every job starts with a plan. We map the work zone and pick access points that keep traffic simple. Then we isolate the area: HVAC supplies and returns get covered and sealed, penetrations and chases are taped, and we build floor-to-ceiling barriers with 6 mil poly. Zip-doors go where crews need to move, and tacky mats get staged outside entries to grab dust from boots.
Next, we bring in HEPA air scrubbers and set at least one up as a negative air machine with ducting to the outdoors. The duct routes through a window or door panel that’s fitted tight so there’s no backflow. Before demolition starts, we power up the equipment, confirm airflow, and check pressure with a manometer. We don’t wait until the room is foggy with dust to see if containment holds. We log an initial pressure reading, then keep logs going during active work, after gross debris removal, and post-cleaning before any barriers come down.
Monitoring And Testing Pressure
There are a few tools we use and a few homeowners can observe. The gold standard is a differential manometer with a data logging feature. One line senses the work zone, the other senses the adjacent clean space. The display shows the pressure differential in inches of water column or Pascals. During demolition, pressure often needs to be bumped a bit to counter all the activity stirring air. We aim for a steady 0.02 to 0.05 inches water column in most residential mold jobs, adjusting for room size and the intensity of work.
For spot checks, a smoke pencil or theatrical fogger makes airflow visible around seams and door flaps. Smoke should move into the containment, not out of it. That said, smoke tests are supplemental. They confirm direction but don’t quantify stability. The log does that. A simple visual is still useful: plastic barriers should lean inward consistently while equipment runs. If the manometer shows drift near zero, we investigate leaks, check duct collars, confirm the HEPA filter is seated, and make sure nobody punched a hole behind a fridge or cabinet that we forgot about.
Mistakes That Blow Containment
Plenty of things can turn a great setup into a spore sprinkler. Here are the hits we see most often:
- Gaps in barriers or unsealed penetrations that become unplanned exhaust vents.
- Running air scrubbers without creating real negative air pressure. Filtration alone is not containment.
- Ducting the exhaust into a garage or another room instead of outside. That just relocates the problem.
- Waiting to start negative air until demolition is already underway. Spores do not wait patiently.
- Undersized equipment or too many bends in the exhaust duct that choke airflow and kill the pressure drop.
- Leaving HVAC returns open inside the work zone. That is a first-class ticket to the rest of the house.
How Homeowners Can Test It
You do not need a PhD to sanity-check negative air pressure containment. Start with your eyes. Stand outside the zip-door and watch the plastic. It should pull inward toward the work zone. Open the flap a few inches and let go. It should drift closed by itself. If it pushes out at you, containment is backwards.
Next, try a safe smoke source like an incense stick. Hold it a few inches from a seam or the zip-door and watch the plume. If smoke gets sucked into the containment, airflow is going the right way. If it blows toward you, stop and ask the crew to check their gauge and inspect for leaks. Keep in mind that doors opening quickly can wobble the plastic briefly. You’re looking for the overall trend with machines running steadily.
Finally, ask to see the pressure readings. Any legit mold remediation company should have a differential manometer or equivalent tool on site and a log that shows readings before, during, and after work. The number you want to see is a negative value showing at least 0.02 inches of water column or about 5 Pascals for most projects. If the scope is large or the work aggressive, higher negative pressure is common. Cross-check the reading with what you see on the plastic so feel matches fact.
Quick Case Study
Here is a job that looked ordinary and had all the ingredients to go sideways fast. A split-level home had a long-standing leak behind a kitchen sink. By the time anyone noticed, the sink base, drywall behind it, and the cavity around a plumbing chase were all supporting mold. Worst part: a return vent was on the same wall. We mapped a full containment zone that captured the kitchen, a slice of the hallway, and the stair opening to the lower level. HVAC supplies and returns inside that footprint were sealed tight. We built double-layer poly barriers around the stairwell and set a framed zip-door at the hallway entry. One HEPA scrubber ran in recirculation to capture dust, and a second was ducted through a window panel as a negative air machine.
Before cutting a single screw, we fired everything up and set the manometer. Initial readings held at 0.03 inches of water column. The plastic leaned in, and the zip-door tugged closed every time a tech stepped through. During demolition, readings bounced to 0.028 to 0.032 as crews pulled cabinets and cut out drywall. We adjusted the exhaust duct for a straighter run and held a steady 0.03 again. Post-cleaning and HEPA vacuuming, the log still showed 0.03. A smoke pencil confirmed airflow into the containment around every seam. That is how negative air containment is supposed to go when a return vent is trying to betray you.
Why It Matters To Your Home
Containment and negative pressure are not just checkboxes. During mold remediation, you are dealing with fragments of growth, spores, and dust that carry allergens and toxins for some species. Once those particles drift into return ducts or shared areas, you suddenly have a bigger and more expensive cleanup on your hands. Worse, a sloppy setup can fail clearance testing, which means more time under plastic and more labor to fix what should not have spread.
On our own site we already spell it out: containment is critical to prevent mold from spreading to unaffected areas of your home. That line from our Mold Removal Costs page is blunt for a reason. You can read it here: Sapphire Restoration: Mold Removal Costs. We also hammer airflow control in our write-up on HVAC mold because ventilation paths are the highways mold loves: Sapphire Restoration: Mold in HVAC Systems. Negative air pressure containment ties those ideas together. It is the technique that changes the air’s mind about where to go, and that keeps the fight inside the ring.
FAQs: Negative Air Mold Containment
What pressure reading should I expect?
For most residential mold jobs, pros target at least 0.02 inches of water column, which is about 5 Pascals. Some projects run closer to 0.03 to 0.05 inches of water column to hold steady during heavy demolition. You should see a negative number on the manometer while machines are running.
Do I really need exterior exhaust?
Yes. If you exhaust to a hallway or another room, you just moved the problem. Proper negative air pressure containment sends filtered air outside so any leakage heads into the work zone and not toward your living room.
Is an air scrubber the same thing as negative air?
Not automatically. A HEPA air scrubber running in recirculation reduces particle counts inside the work zone but does not create the pressure drop that protects the rest of the home. You need a scrubber set up as a negative air machine with exterior exhaust to establish negative air pressure containment.
How can I tell if the plastic is installed right?
Look for full-height barriers, tight seams, and a zip-door that doesn’t flap like a sail. When equipment is on, plastic should lean inward toward the work zone. If you see bubbles pushing out, speak up and ask for a pressure check.
What standards back this up?
The EPA’s Mold Course describes when to use limited or full containment and how negative pressure protects adjacent areas. Guidance documents like the Minnesota Department of Health’s remediation advice reference a 5 Pascal minimum for negative pressure and match common industry practice. Trade resources such as National Mold Authority explain pressure ranges and HEPA performance in plain terms.
How To Talk To Your Contractor
Ask a few simple questions and you’ll know if you’re getting pro-grade containment or a plastic curtain cosplay. What’s your target pressure differential, and how do you monitor it? Where does the negative air discharge go? How often do you log readings, and can I see the log? How are you sealing HVAC openings and penetrations? If your contractor lights up because you asked, you picked a good one. If they dance around the answers, that’s your cue to keep shopping.
Gear Specs That Actually Matter
Some equipment talk matters, some is marketing gloss. HEPA filters should be rated to 99.97 percent at 0.3 microns. The unit needs enough airflow to maintain negative pressure with real-world resistance from filters and duct runs. Duct diameter and length directly affect performance, so big turns and long runs cut airflow more than you think. Barriers should be 6 mil poly, not thin painter’s film that tears when someone looks at it wrong. And yes, a calibrated manometer beats a finger held up to the wind every day of the week.
What If The Power Goes Out?
If the machines stop, negative pressure disappears with them. Crews should pause dusty work, close access flaps, and stabilize the scene until power is restored or a generator is running. Once equipment is back online, the team should verify pressure, run a quick smoke check at key seams, and resume work when the log shows the system is stable again. This is one reason pressure logs matter. They tell the story of control, not just a snapshot when everyone is watching.