
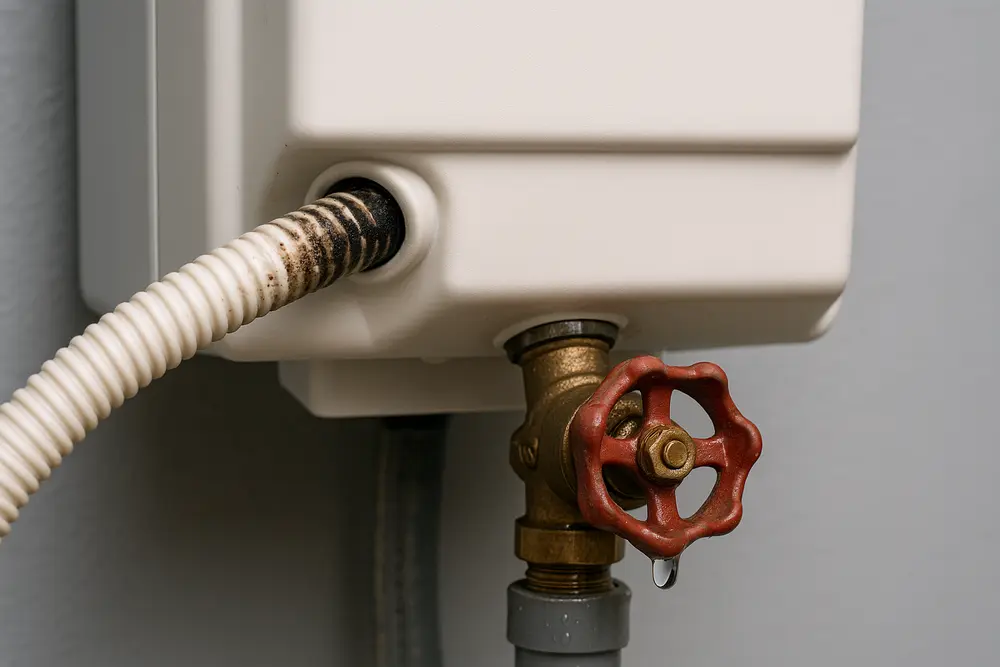
A whole-house humidifier can leak for days without producing the dramatic puddle homeowners expect. A humidifier drain line clog may overflow only during a call for humidity, while a humidifier supply valve leak may drip around the clock. Either one can send water down furnace seams, beneath flooring, into nearby walls, or through the ceiling below. By the time you notice a stain, the visible spot may be several feet from the failed part.
Why a Small Leak Stays Hidden
Most flow-through humidifiers operate during the heating season, when the humidistat calls for moisture and the furnace is running. Water enters a distribution tray, moves across an evaporative water panel, and drains away. That sounds simple because it is simple, at least until scale, poor installation, or an aging valve interferes.
An intermittent leak is especially deceptive. Imagine that the humidifier releases half a cup of water during each long heating cycle. The mechanical-room floor may look dry later because some water evaporates. Meanwhile, drywall paper, wood framing, cabinet insulation, or the subfloor gets wet repeatedly. A homeowner sees no puddle, but the wall beside the furnace slowly develops a musty odor and swollen baseboard.
Water also follows paths that aren’t obvious. It can cling to a pipe, track along wiring, move through a sheet-metal seam, or wick beneath a furnace platform. Sheet metal may look dry on the outside while insulation on the other side holds moisture. Touching the exposed floor and deciding everything is dry isn’t a reliable test.
How a Humidifier Drain Line Clog Starts
A flow-through humidifier usually sends more water across its panel than it evaporates. The remaining water must enter the drain pan and leave through a drain tube. When that route is restricted, the tray or pan fills faster than it drains. Water then spills into or around the humidifier cabinet.
Hard-water scale is a common cause of a humidifier drain line clog, but it isn’t the only one. Sediment can collect at the drain outlet. A flexible hose can become kinked behind the furnace, sag low enough to hold debris, or be installed without adequate downward fall. We’ve also found tubing pinched by stored boxes and drains connected to floor drains that were backing up. If a drain terminates in an unconditioned area, freezing is another possibility.
Typical clues include white mineral deposits below the humidifier, gurgling or splashing sounds, water along the cabinet, and a drain hose that stays full. During normal operation, you should generally be able to confirm that water is reaching the approved drain location. The exact flow depends on the model, so use the manufacturer’s manual rather than guessing at a universal flow rate.
If the leak appears only when the humidifier operates, an obstructed drain is a reasonable suspect. It’s still only a suspect. An overflowing tray, excessive water flow, misaligned panel, or leaking solenoid outlet can produce the same pattern.
When Water Panels Redirect the Flow
People often describe this as a “cracked pad,” but many evaporative humidifiers don’t contain a solid pad that cracks like a tile. They use a mineral-coated mesh water panel held inside a frame. That panel may become brittle, torn, collapsed, deformed, or heavily coated with scale.
Heavy buildup prevents water from spreading evenly. Instead of moving across the panel and into the drain pan, water channels toward one edge. A panel installed backward, upside down, or outside its frame can do the same thing. The arrow printed on a replacement panel isn’t decorative.
The rigid parts around the panel can actually crack. A damaged frame, distribution tray, drain pan, or plastic housing may release water even when the drain tube is clear. The wrong replacement panel can also leave gaps that direct water outside the pan. Before blaming the drain, an HVAC technician should inspect the entire water path from the feed tube to the drain outlet.
Finding a Humidifier Supply Valve Leak
The phrase “supply valve” gets used for several different parts, and that can make troubleshooting confusing. The manual shutoff connects the humidifier to household plumbing. Some older installations use saddle valves that puncture a water line. The solenoid valve is the electrically controlled component that opens when the humidifier calls for water.
Manual Shutoff and Saddle-Valve Leaks
A manual valve can leak from its stem, packing, seal, puncture point, or attached compression fitting. Corroded copper, cracked plastic tubing, and loose connections are also common problems. Because these parts can remain under household water pressure, they may leak even when the humidifier control is off.
Be cautious with an old saddle valve covered in green corrosion or mineral deposits. Forcing it closed can break the valve or turn a slow drip into a larger leak. A plumber may need to close an upstream valve and replace the connection properly.
Solenoid and Tubing Leaks
The solenoid valve opens during a humidity call. Scale or debris can keep it from closing completely, while worn seals, a cracked body, or loose inlet and outlet fittings can leak under pressure. Tubing often fails close to a fitting where repeated movement has stressed it.
A solenoid outlet or downstream connection may leak only during humidifier operation. A stuck-open solenoid can continuously feed the panel, overwhelm the drain, and raise indoor humidity. Turning the humidistat off is useful, but it isn’t a substitute for closing the water supply when a pressurized fitting is leaking.
Use Leak Timing as a Clue
Observing when water appears helps narrow the possibilities. It doesn’t replace inspection, especially when water has entered a furnace cabinet.
| Leak Pattern | Possible Causes |
|---|---|
| Water appears only while the humidifier runs | Clogged drain, overflowing tray, misaligned panel, excessive flow, or solenoid-side leak |
| Water continues with the humidifier control off | Manual valve, upstream tubing, compression fitting, or pressurized valve-body leak |
| Water stops only after the supply is closed | Supply-side leak or a valve that isn’t closing |
| Water appears after a delay | Moisture draining from insulation, cabinet seams, flooring, or a wall cavity |
Here’s a practical example. If the floor is dry all afternoon but becomes wet during a long overnight heating cycle, inspect the operating-side components and drain path. If droplets continue forming at a compression fitting after the humidifier is switched off, the pressurized supply connection deserves attention. Don’t perform an operating test if doing so could energize wet equipment.
Where Hidden Water Damage Collects
The puddle beside the furnace is rarely the full inspection area. Water may be underneath the furnace or air handler, inside the blower compartment, behind insulated cabinet panels, or beneath a supply or return plenum. It can reach a control board, transformer, motor, switch, wiring connection, or other component that shouldn’t get wet.
Outside the equipment, drywall, baseboards, wall plates, carpet, carpet pad, and insulation can pull water away from the original leak. Laminate and engineered wood may swell at their edges before the subfloor feels wet from above. Plywood and OSB can remain damp underneath a visually dry finish.
An attic or upper-floor installation deserves extra attention. Water can soak a furnace platform, enter a ceiling cavity, and stain the room below. In a closet installation, it may move behind finished walls where airflow is poor. Insulated ductwork can hide moisture between the metal duct and its insulation.
Possible damage includes softened drywall, deteriorated paper facing, flooring delamination, odors, staining, reduced insulation performance, and corrosion. Water near a furnace doesn’t automatically mean the heat exchanger is damaged. That’s a determination for a licensed HVAC professional after inspecting the affected equipment.
What to Do Right Away
-
Stay away from wet electrical equipment. Don’t open furnace panels, touch a wet cabinet, or stand in water while operating controls. If a service switch, disconnect, or circuit breaker can be reached from a dry location, shut off power to the furnace and humidifier. If it can’t be reached safely, stay out and call for qualified help.
-
Close the humidifier’s manual water-supply valve. If that valve is leaking, badly corroded, or unsafe to operate, close an appropriate upstream shutoff or the home’s main water valve. Don’t force a corroded saddle valve.
-
Set the humidifier control to off. Don’t rely on the control alone when the manual valve, supply tubing, or pressurized side of the solenoid is leaking.
-
Keep children and pets away. Move unaffected belongings only if there’s no electrical or slip hazard. A container may catch a minor drip, but don’t place towels against energized equipment.
-
Photograph the source, water line, drain tube, valves, stains, damaged finishes, and rooms below the equipment. Record the humidifier and furnace model numbers if you can do so without approaching wet components.
-
Arrange the correct inspections. An HVAC contractor handles the humidifier and furnace, a plumber may be needed for the household water connection, and an electrician should evaluate affected electrical equipment when appropriate. A restoration company addresses extraction, hidden moisture, material removal, drying, and cleaning.
Don’t restart the furnace to “help dry things out” if water entered the cabinet or reached electrical or combustion-related parts. A dry exterior doesn’t prove motors, controls, switches, or insulation are safe.
How Safe Drying Actually Works
Repair the Source First
Drying equipment can’t win against an active leak. The drain line, drain outlet, water panel, tray, pan, solenoid, supply tubing, and fittings should be inspected before structural drying begins. Repairs may include clearing or replacing a drain, correcting its routing, installing the correct panel, replacing a cracked tray, or replacing a deteriorated valve.
The technician should also observe a complete operating cycle after repairs, provided the furnace is safe to run. A drain that accepts a cup of test water isn’t necessarily proven under actual operating flow.
Map Moisture Beyond the Puddle
Restoration professionals may use noninvasive meters for screening, pin meters for material readings, and thermo-hygrometers for air conditions. An infrared camera can help locate temperature differences, but it doesn’t prove that material is wet. Meter readings and physical inspection must confirm what the camera suggests.
Targeted openings may be needed behind a baseboard, beneath flooring, or inside a wall cavity. This isn’t demolition for entertainment. It’s a way to determine whether hidden insulation or framing is holding water and preventing the assembly from drying.
Extract and Evaluate Materials
Standing water should be extracted promptly using suitable equipment. Don’t use a household vacuum unless it’s specifically rated for wet pickup and can be operated without electrical risk.
Metal and plastic surfaces are often cleanable if they haven’t corroded or suffered electrical damage. Solid wood can frequently be dried, although swelling, checking, and finish damage may remain. Drywall might be dried in place after limited, recent exposure if it’s structurally sound and doesn’t conceal wet insulation. Soft, swollen, contaminated, or deteriorated drywall may need removal.
Cellulose insulation holds water and is commonly difficult to save. Carpet, pad, laminate, engineered wood, and composite flooring require case-by-case decisions based on exposure time, water condition, delamination, and subfloor moisture. Furnace cabinet insulation isn’t ordinary wall insulation and should be evaluated according to the equipment manufacturer’s requirements.
Control and Verify Drying
Commercial dehumidifiers and air movers are positioned to manage evaporation and remove water vapor. Depending on the loss, technicians may remove baseboards, create limited drying openings, establish containment, or use air filtration. Fans shouldn’t be aimed at visible mold or contaminated material without a remediation plan because uncontrolled airflow can spread particles into the room or HVAC system.
Drying isn’t complete because three days have passed or the floor feels normal. Technicians track moisture content, relative humidity, temperature, and conditions at hidden interfaces. Affected materials are compared with suitable dry standards or similar unaffected materials. The goal is measured drying, not optimistic guessing. The ANSI/IICRC S500 provides the professional framework commonly used for water-damage inspection, drying, monitoring, and documentation.
After drying, salvageable surfaces are cleaned and unsalvageable materials are replaced. Reconstruction should wait until readings support it. The furnace and humidifier should receive HVAC clearance before restart, followed by an observed operating test of both the supply and drain systems.
Can You Dry It Yourself?
A limited homeowner response may be reasonable when the leak was tiny, recent, and completely outside the equipment. Water should not have entered a wall, ceiling, flooring cavity, duct system, or electrical component. There also shouldn’t be a musty odor, visible growth, soft drywall, swollen flooring, or uncertainty about what’s wet.
Even in that narrow situation, you need a way to verify drying rather than judging by color or touch. A portable dehumidifier may lower room humidity, but it can’t prove that water beneath a furnace platform or behind drywall has dried.
Professional restoration is the safer choice when water entered the furnace, affected multiple materials, reached the room below, or remained undiscovered. It’s also appropriate when the source is uncertain, damage has been present for roughly 24 to 48 hours, or occupants have asthma, allergies, immune suppression, or other health vulnerabilities.
Mold Risk Changes With Time
Humidifier water generally begins as household supply water, but its condition can change after traveling through a scaled drain pan, dirty cabinet, dusty insulation, flooring, or a drain backup. Exposure time, temperature, material type, and what the water contacted all affect cleanup decisions.
The EPA recommends drying wet materials promptly, often using 24 to 48 hours as a prevention target. That isn’t a stopwatch declaring that mold always appears at hour 49. It’s a reason to act quickly before slow evaporation turns a repairable wet area into a removal project.
If visible or suspected mold is inside the furnace or duct system, don’t operate the system until it’s evaluated. Airflow can distribute contamination. EPA guidance doesn’t support automatic whole-house duct cleaning after every humidifier leak. The ducts and insulation should first be inspected for actual moisture or contamination. Wet, mold-affected insulated duct material may require specialized replacement rather than routine cleaning.
Don’t Blame the Humidifier Too Quickly
Water around a furnace doesn’t prove the humidifier caused it. A high-efficiency furnace may have its own condensate tubing and trap. An air conditioner has an evaporator drain, and either system may use a condensate pump. Nearby water heaters, plumbing lines, foundation seepage, and roof leaks can create similar puddles.
Identify which equipment is operating when the leak appears and trace the water path without energizing wet equipment. In winter, a humidifier is a strong candidate. In summer, an air-conditioning drain is more likely. If water appears regardless of HVAC operation, inspect pressurized plumbing and building leaks.
This guidance primarily applies to flow-through evaporative humidifiers, including bypass and fan-powered models. Steam humidifiers have model-specific components and hazards involving hot water, steam, electrodes, canisters, and dedicated drains. They shouldn’t be treated as evaporative panel units.
Excess indoor humidity can also cause condensation without a plumbing leak. Moisture on windows, cold ducts, exterior walls, or attic surfaces may indicate that the humidity setting is too high for current outdoor conditions and the home’s construction. There’s no single relative-humidity setting that’s correct for every building and climate.
How to Prevent Another Leak
Inspect the humidifier at the start of each heating season rather than waiting for white crust or a ceiling stain. Replace the water panel according to the model’s instructions, use the correct type, and install it in the marked orientation. Check the distribution tray for blocked openings and verify that water reaches the drain while the humidifier operates.
Use a flashlight to inspect behind and beneath the furnace. Look for rust streaks, mineral deposits, damp insulation, corroded fittings, cracked tubing, and drain hoses with kinks or low spots. Where practical, keep the drain discharge visible so a lack of flow is easier to notice.
A water-leak alarm near the equipment is inexpensive compared with replacing a finished ceiling. Automatic shutoff devices may also make sense when the furnace is in an attic, upper-floor closet, or finished area. Old plastic supply tubing and unreliable saddle valves deserve professional attention before they fail.
If you’ve found water around your furnace, Sapphire Restorations can inspect for hidden moisture, extract standing water, dry affected building materials, and remove materials that can’t be restored. Source repairs and furnace clearance should be coordinated with the appropriate plumber or licensed HVAC contractor, while restoration work confirms that the wall, floor, ceiling, and other concealed areas aren’t still holding water.