You bought a high-efficiency tankless to save energy, not to fund a concrete-eating chemistry experiment in your walls. Here’s the quiet truth: condensing tankless units make acidic condensate. If you skip a condensate neutralizer, route the drain wrong, or forget an air gap drainage point, that acidic dribble can pit copper, carve grout lines, stain slabs, and rot framing. Add a pan with a float switch and a few quick checks, and you’ll shut down small leaks before they snowball into mold and flooring tear-outs.
Why Condensate Is So Nasty
Condensing tankless heaters squeeze extra heat from exhaust. That efficiency comes with a side effect: condensate loaded with carbonic acid and other byproducts. It runs mildly to very acidic, and repeated exposure chews on metal, etches concrete, and stains masonry. Untreated discharge can also rough up sewer and septic components over time. Many jurisdictions treat this as corrosive waste, which is why codes often require neutralization before discharge. If you want the deep dive into why the pH matters and how codes address it, JJM Alkaline Technologies and Plumber Magazine lay it out clearly.
Left to its own devices, acidic condensate will corrode thin-wall tubing, eat pinholes in fittings, and wick under plates and along slab joints. That shows up as mystery dampness around baseboards, salty white crust on concrete, or a brown-black streak where a drain line kisses a wall. It’s sneaky, and it’s fixable.
Condensate Neutralizer Basics
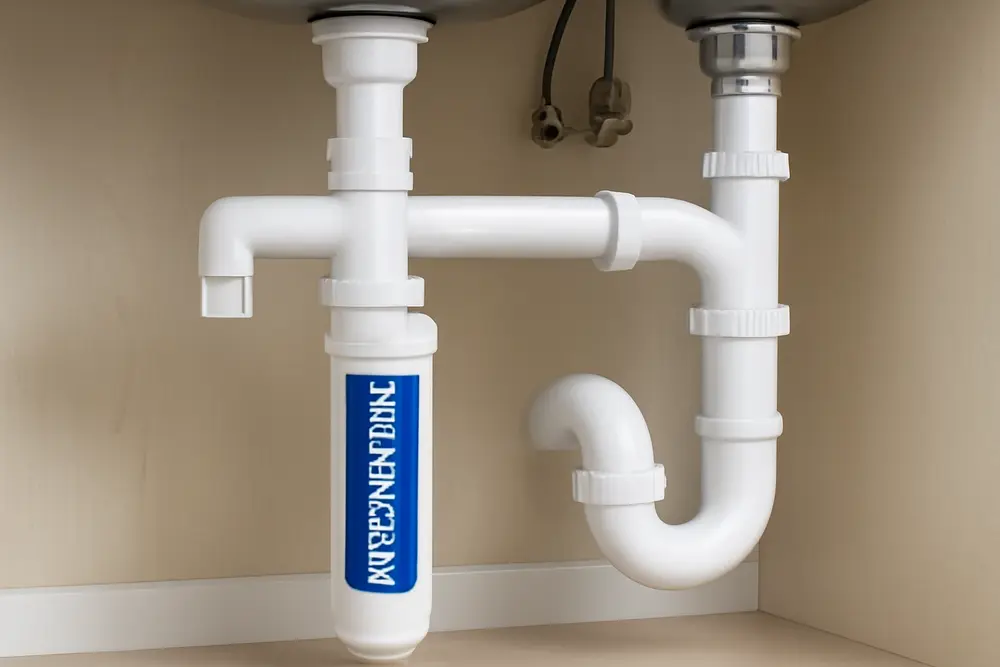
A condensate neutralizer is a simple, unsung hero: a cartridge or tank filled with media like calcite, limestone, or magnesium oxide. Condensate passes through that media, which dissolves just enough to raise the pH into a code-friendly range before it hits your drain. That keeps pipes, traps, and foundations out of harm’s way. Models range from compact inline cartridges that tuck right under a tankless to larger tanks for multi-appliance setups. You’ll also see combo units that integrate a neutralizer with a condensate pump for installations where gravity isn’t your friend.
Neutralizer options worth a look include the Little Giant NC-2 series, AERCO neutralizer kits, and transparent-bowl designs like HCE Acid X Vent that make inspection a snap.
Types of Neutralizers
Inline cartridges: These are compact, easy to retrofit, and great for single tankless installs. They mount near the unit, keep the run short, and often have clear housings so you can see the media level. They’re perfect when you have gravity drain and a straightforward route.
Tank neutralizers: Larger vessels with more media volume. Pick these when you’re dealing with higher firing rates, long run times, or multiple appliances tied into one drain. More media equals longer service intervals and stable pH across seasons.
Neutralizer-pump combos: If the only drain is up, around the corner, or across the room, a neutralizer with a built-in pump is a tidy solution. It raises pH and then lifts the condensate to an approved termination point. Some even include an alarm.
Maintenance That Actually Works
Neutralizing media is sacrificial by design. It dissolves as it does its job, which means your neutralizer needs refills. A good rule of thumb is to inspect every 6 to 12 months, sooner if your unit runs hard during colder months. Transparent housings make this painless, and replaceable media trays keep it clean. If you see the media depleted, clumped with sludge, or your pH test reads low, it’s time to swap the media. Skipping maintenance is the fastest way to push acidic water straight through your system.
Brand-specific kits like JJM’s pH-increasing pellets and refill packs from Little Giant or AERCO make service simple. Keep spare media on hand, and label the housing with the date you last serviced it. You know who else labels the neutralizer? The person who isn’t tearing out baseboards later.
Routing That Drains Every Time
Even with perfect neutralization, a bad drain run invites backups and leaks. Keep the pipe size and material per manufacturer instructions and codes. Maintain a continuous downward slope with no bellies that collect goo. Many tankless units already include an internal trap, so adding an extra external trap can cause air-lock and poor flow. If you’re not sure, check the manual and avoid creating a second trap.
Do not tie the condensate line into the T and P relief drain, potable water piping, or an AC condensate line that can backflow. You want isolation. Long horizontal runs, shared lines, and tees without thought are how water ends up flowing the wrong way inside your walls. Protect the line from freezing if it passes through unconditioned space, and use UV-resistant materials if you’re anywhere near sunlight.
Incorrect tie-ins and sagging runs are some of the most common reasons we get called for drywall mushrooms and slab staining. Keep it simple: short, sloped, and isolated is the winning formula.
Air Gap Drainage Prevents Backflow
Air gap drainage means you’re discharging condensate into a receptor with a visible vertical separation between the outlet and the flood rim of the drain. That small but mighty gap stops siphoning and sewer gas from migrating back into your heater, and it gives you an instant visual check for flow. Many local codes require a fixed, visible air gap where the condensate enters a floor sink, standpipe, or hub drain. A common rule is an air gap at least equal to two pipe diameters or at least 1 inch, but always follow your local code and manufacturer guidance.
Smart termination points include a floor sink, a dedicated hub drain, or a laundry standpipe that is sized correctly and configured with an approved air gap. Some jurisdictions allow discharge to the outdoors only if it won’t freeze, stain a façade, or damage soil and concrete. Tucked-behind-the-dryer hoses into mystery holes are not air gaps. If you can’t see the separation and it isn’t fixed in place, it’s not doing its job.
Where to Terminate Safely
Best practice is to neutralize then discharge through a rigid air gap into a floor sink or hub drain that you can see. If gravity won’t get you there, a neutralizer-pump unit can lift to a proper receptor and still maintain a visible gap at the inlet. Resist the urge to share with AC drains or to bury the end of the line into a trap. That short-cut is how biofilm and lint work their way back toward your heater.
Pans, Float Switches, and Sensors
A drain pan under a tankless is cheap insurance, especially when the unit lives over finished floors, in a closet, or on an interior wall. A pan catches minor drips from fittings, valve service, and overflows when a drain line clogs. Route the pan to a visible drain or a safe discharge point with its own air gap, and make sure the pan outlet is not hidden behind trim.
Add a float switch in the pan and wire it to shut down the heater, close a condensate pump, or trigger an alarm when water rises. Keep the switch accessible so you can test it, and mount it so minor splashes don’t false-trip. When that switch interrupts operation, it’s not being dramatic. It’s keeping you from scraping soggy drywall out of the pan with a shop vac.
Fast Maintenance Checks
You don’t need a plumbing license to spot the early warning signs. Set a recurring reminder and take 5 minutes. Here’s a simple cadence that keeps trouble from festering:
| Frequency | What To Check | Why It Matters |
|---|---|---|
| Monthly | Look for wet spots under the unit, check the pan for standing water, confirm the air gap is clear and dripping when the heater runs. | Catches clogs, kinked hoses, and early leaks before materials soak through. |
| Quarterly | Inspect the condensate line for sags, algae, or scale. Make sure the neutralizer housing is not empty or heavily discolored. Test the float switch. | Prevents blockages and verifies that backup protection actually works. |
| Annually | Replace or refill neutralizer media, clean the line if needed, and do a quick pH check of discharge after the neutralizer. | Keeps pH within safe range and extends the life of your drain system. |
Early Warning Signs
If your condensate setup is going sideways, it usually leaves breadcrumbs:
Sour odor near the tankless, a salt-like crust on concrete or tile grout near the drain path, a faint brown or green streak under the unit, paint bubbling at the baseboard, or a slow drip you can hear but can’t see. If you touch the discharge coming out of the neutralizer and it feels gritty or the tubing shows pitting or dark stains, the pH may be too low and the media could be spent.
Simple pH Check at Home
A quick pH check puts numbers to the guesswork. Use inexpensive aquarium-grade pH strips or a digital pen.
Run the tankless so you have a steady condensate flow. Catch a sample after the condensate neutralizer in a clean cup. Test within a few seconds. Most codes accept a discharge range roughly between 5.0 and 9.5, but the closer you are to neutral, the happier your plumbing will be. If you’re consistently below roughly 5, change the media and retest. If the pH looks good but you still see corrosion, look for mixed-metal contact, long stagnant runs, or cross-connections that bypass the neutralizer.
Real-World Saves
The neutralizer was there, but never serviced. We traced a slab stain to a tankless where the media had fully dissolved. The line after the neutralizer was etched and leaking in a wall cavity. New media, new section of tubing, and a corrected route with air gap drainage ended the mystery puddle.
A DIY tie-in to an AC condensate line seemed clever until the AC drain clogged mid-summer. The blockage sent gunk back toward the tankless, which then overflowed at a fitting inside the wall. Separating the lines and adding a visible air gap at a floor sink stopped the backflow circus.
Float switch for the win. A customer’s drain line picked up lint after a laundry room remodel and slowly choked. The pan float switch tripped, shutting the heater down and pinging a smart alarm before a drop hit the floor. A 10-minute vacuum and a media refill later, they were back in hot water without the soggy saga.
When to DIY and When to Call Us
DIY-friendly: visual inspections, clearing obvious kinks, testing the float switch, swapping neutralizer media on transparent, serviceable housings, and doing a basic pH test. If the drain path is short, the air gap is accessible, and everything is glued and strapped well, you can keep the basics tidy.
Call a pro if you see recurring low pH despite fresh media, any sign of backflow, corrosion on metallic drain parts, wet walls or flooring, a unit that turns off repeatedly without explanation, or a drain route that crosses systems. Rerouting with proper slope, installing a fixed air gap receptor, and wiring a float switch into a shutoff circuit are fast for us and messy for most homeowners.
Trusted Sources for Gear
If you like to read spec sheets before breakfast, these are solid places to start:
- JJM Alkaline Technologies for the why and the media science.
- Little Giant NC-2 for cartridge-style neutralizers and kits.
- AERCO for larger-capacity neutralizer kits.
- HCE Acid X Vent for a transparent housing that makes checks faster.
New Install Start-Up Tips
Size the condensate neutralizer for the appliance firing rate and expected run time. Mount the neutralizer where you can see and service it. Route the line with steady downward slope and no bellies. Terminate with a fixed, visible air gap drainage setup into an approved receptor. If you must pump condensate, use a neutralizer-pump combo and keep the final discharge air gapped. Place a pan under the unit, plumb the pan drain to a visible termination, and add a float switch that cuts power to the heater or triggers an alarm. Label the neutralizer with the install date and your target service interval.
If you just replaced a standard heater with a condensing tankless, this is the most common place we see shortcuts. The new unit needs a neutralizer, isolation from other drains, and a compliant air gap. Reusing the old drain without those upgrades is how you end up funding a calcium-art project on your slab.
Quick Fixes That Pay Off
If you only do three things this week, make them count. First, verify you actually have a neutralizer between the tankless and the drain. Second, follow the condensate line to the end and look for a real air gap you can point to. Third, pour a cup of water into the pan and make sure it drains while the float switch does what it’s supposed to. Those ten minutes can save you thousands in repairs we’d rather help you avoid than bill you for.
If you want a fast inspection, a media refresh, or a reroute that checks every box, we’re happy to swing by. We fix water, mold, and fire damage, but preventing damage is our favorite job. Neutralizer tuned, air gap visible, float switch tested. That’s how you keep the hot water flowing without turning your house into a lab experiment.