You know those fuzzy gray freckles that keep blooming along a chilly corner or under a window like your wall’s trying to grow a beard? That’s not character. That’s thermal bridging mold, and it’s your house telling you some surfaces are colder than they should be. The fix isn’t a bleach prayer and a paint touch-up. It’s stopping cold spot condensation by eliminating the cold spots in the first place with continuous insulation, real air sealing, and smart humidity control. I restore homes for a living, and I’ll show you how to find the bridges, why they grow fuzz, and what simple upgrades actually stop the micro-condensation that feeds mold.
What Is Thermal Bridging?
Thermal bridging is what happens when heat takes a shortcut through your building by riding a more conductive material from hot to cold. Think of metal fasteners, steel beams, wood studs, slab edges, and window frames as tiny express lanes for heat loss. Insulation works by slowing heat flow. Interrupt it with a conductive element and you’ve got a bridge that drags interior surface temperatures down. Cold surface plus indoor humidity equals condensation, and if that surface hangs out at or near dew point long enough, you’ve primed it for mold.
There are a few flavors worth knowing:
Clear field bridges happen across regularly spaced framing like wood studs in a wall. Even with batt insulation in the cavities, the studs themselves are colder pathways. That can knock your effective R-value down by 10 to 20 percent right out of the gate. In metal-framed walls, it can be much worse.
Linear bridges run along lines like slab edges, balcony connections, rim joists, and roof-to-wall junctions. They’re relentless and long, so they pull down temperatures across a strip of your interior.
Point bridges are concentrated at fasteners, anchors, or brackets. On their own they’re small, but in a dense pattern they add up.
Building Science Corporation explains just how quickly bridges torch your R-value and spike condensation risk if your interior surfaces drop below dew point. Fewer and weaker bridges equal warmer surfaces and fewer mold parties. For a solid primer, see Building Science’s “Thermal Control in Buildings” and the fundamentals at ContinuousInsulation.org, which breaks down clear-field, linear, and point bridges and why continuous insulation matters (buildingscience.com, continuousinsulation.org).
Why Cold Spots Grow Fuzz
Mold isn’t a mystery. It needs moisture, a food source, and time. Drywall paper, dust, and wood trim serve up the food. Time is supplied by your schedule. Moisture sneaks in when interior surfaces hit or dip below dew point. That’s the temperature where the air in the room can’t hold any more water vapor and drops it as condensation. If a corner, window reveal, or baseboard edge is colder than the air’s dew point, microscopic water films form. It can be so slight you never see a drip. ASHRAE calls it surface condensation, and it happens before you ever get visible water marks. That micro-condensation is all mold needs to colonize, especially in shaded corners or behind furniture where air doesn’t circulate.
Cold surfaces happen two ways: through-bridging conductive materials, and air leaks that bathe one area with colder outdoor air. Fix one without the other and you’re still rolling the dice. ASHRAE’s moisture guidance is clear about keeping warm-side surfaces above dew point and holding indoor relative humidity in check to keep surfaces from becoming Petri dishes (ASHRAE Handbook).
How To Spot Thermal Bridge Mold
Let’s skip the guessing. You can find cold spot condensation in a few easy steps.
Start with your eyes and your nose. Mold from thermal bridging often shows as:
- Patchy growth or ghosting that traces studs, fasteners, or baseboard lines.
- Fuzzy spots in upper corners, around window frames, or at ceiling-to-wall lines.
- Peeling paint or slight discoloration where surfaces feel cool to the touch.
Then get a cheap infrared thermometer or a basic thermal camera attachment for your phone. On a cold day, scan interior corners, window reveals, electrical box perimeters, and along baseboards. If one stripe is consistently 5 to 10 degrees colder than nearby surfaces, you likely found a bridge. Follow up with a small digital hygrometer so you know your indoor relative humidity. If you see 50 to 60 percent RH or higher and cold stripes, you’ve basically got a standing invitation to condensation. A quick dew point calculator app lets you plug in temperature and RH to see if your surface temps are below the dew point. If they are, that cold stripe is a mold farm-in-waiting.
Usual Suspects At Home
Thermal bridges tend to cluster where trades had to choose speed over continuity. Here’s where we find them on jobs:
Stud-to-sheathing walls. The studs and plates form a grid of colder zones that print through paint as ghosting or dust patterns. With metal studs, it’s more dramatic.
Slab edges and rim joists. Where a concrete slab meets exterior air, interior baseboards get chilly. Same for rim joists and band joists, especially in basements or crawlspaces, which then sweat on humid days.
Window and door frames. Aluminum frames and under-insulated jambs are classic bridges. Watch for mold along the lower corners or reveals where the interior surface is coolest.
Balconies and canopies. If that concrete slab or steel angle clips through the wall, it pulls heat right out, chilling the interior around it. That liner of fuzzy spots along the interior ceiling near a balcony connection is your clue.
Roof-to-wall and eaves. Poorly detailed insulation at the top plate or eaves makes for cold corners. Studies on external wall insulation show roof-wall junctions are frequent problem points unless details extend the insulation correctly (ScienceDirect study).
Ducts in cold attics. Bathroom fan ducts that run through a cold attic or terminate poorly can fill with condensate, then drip and stain the drywall below. It’s a cousin of the bridging problem: a cold surface in a humid airstream (our bathroom fan guide).
Three Upgrades That Work
You stop thermal bridging mold by making the cold surfaces warm and the moist air less clingy. That means adding continuous insulation, sealing the air, and tuning humidity. Do all three and you get a quieter, tighter, healthier house with a power bill that stops screaming.
Continuous Insulation That Kills Cold Stripes
Continuous insulation, or CI, is exactly what it sounds like: insulation that runs unbroken across the building’s thermal envelope so studs, slab edges, and other bridges don’t steal heat. Exterior rigid foam, mineral wool boards, or insulated sheathing are common ways to do it. On the interior side, continuous spray foam, insulated plasterboard, or furring plus rigid foam can help when exterior work isn’t feasible.
Why it works: with CI, you wrap the whole wall so the studs are now behind a warm coat. Those linear and clear-field bridges get smothered. According to building science research, studs and other conductive elements can slash effective R-values by 10 to 50 percent depending on what you used and how it’s framed. CI hands you back that lost performance by short-circuiting the short-circuit. Less heat escaping means interior surfaces stay above dew point.
Where to target first:
- Exterior walls that feel chilly even when the thermostat says you’re fine.
- Slab edges and rim joists where you’ve seen baseboard mold or musty smells.
- Window and door reveals that sweat during winter mornings.
Real-world steps we see win:
Retrofits: add 1 to 2 inches of exterior rigid foam or mineral wool during siding replacement, use long fasteners designed for CI, and properly flash windows to the exterior insulation layer. If you can’t go outside, use a smart vapor retarder plus a continuous interior foam layer under new drywall in targeted rooms.
New builds: specify insulated sheathing, align window flanges with the insulation plane, and use advanced framing to reduce the number of studs. ContinuousInsulation.org has good framing-reduction tips and details for minimizing bridges.
Air Sealing and Thermal Breaks That Matter
If continuous insulation is the coat, air sealing is zipping it up so cold air can’t sneak inside and chill the interior surfaces. Even a well-insulated wall can grow mold if air leaks push humid indoor air to a cold spot or pull cold outdoor air across interior finishes.
Where to seal:
- Top plates, bottom plates, and rim joists with a quality sealant or foam.
- Electrical boxes, plumbing penetrations, and exhaust fan housings with gaskets or fire-rated sealants where needed.
- Attic hatches, recessed lights rated for insulation contact, and duct boots with mastic or foam tape.
Thermal breaks are thin, less-conductive layers placed between a cold element and your warm interior. Add a thermal break at:
Metal connections like ledger angles, balcony brackets, or steel posts with structural thermal break pads or isolated connectors made for this job. You reduce the bridge right where it crosses the envelope.
Window frames by choosing thermally broken frames and installing insulating backer rod and low-expansion foam around the jambs.
Slab edges with edge insulation that runs up the perimeter behind finishes. Even a thin continuous strip makes a big temperature difference on the interior side.
Think of air sealing and breaks as a one-two: stop the airflow that moves moisture to cold surfaces, and interrupt the conductive path that cools the surfaces in the first place.
Targeted Humidity Control That Keeps Dew Point Away
Even the best thermal fix can lose to a sauna inside your house. Keep indoor RH under about 50 percent in winter and under 60 percent in summer. That alone raises your safety margin between room temp and dew point.
What works fast:
Ventilate right. Run bath fans during showers and for 20 minutes after. Duct them outside and insulate those ducts if they run through unconditioned spaces. Range hoods should actually vent out, not just recirculate.
Dehumidify smart. Basements, crawlspaces, and tight newer homes benefit from a dedicated dehumidifier. Aim for 45 to 50 percent RH and drain it directly so you actually use it.
Use hygrometers. Park a $10 hygrometer in the rooms that struggle. If it reads 60 percent regularly, you need more exhaust or dehumidification. Set reminders on your phone until it’s a habit.
Balance the HVAC. Oversized AC systems short-cycle and don’t dehumidify properly. A tune-up, lower fan speeds, or a variable-speed upgrade can make a big difference.
ASHRAE guidance is clear that warm-side surfaces need to sit above dew point, and you control that two ways: raise the surface temperature and lower the dew point by dropping RH. Do both and cold spot condensation runs out of runway.
Field Examples You Can Picture
We see these patterns over and over:
The bathroom ceiling constellation. An uninsulated or poorly insulated bath fan duct runs through a cold attic. Moist air hits a chilled duct, dumps condensate, and it rains back on your drywall. Result: speckles of mold around the fan housing. The cure is simple: insulate and slope the duct to the exterior, use a tight damper, and run the fan long enough to drop RH. We broke this down in our bath fan fix guide.
The ghosted studs. A 1970s wall with R-13 batts but no exterior insulation has a winter interior temp of 70, interior RH of 50 percent, and interior surface temps that fall to the low 50s on stud lines. Dew point sits around the upper 40s, so those stud lines skim condensation at night and feed patchy mold. Adding 1.5 inches of exterior mineral wool during a siding replacement warms those lines into the 60s, and the ghosting stops.
The slab edge stripe. In a finished basement with drywall tight to a concrete slab edge, the baseboard shows musty-smelling growth every February. Installing a continuous edge insulation detail behind the baseboard and air sealing the rim warms the interior surface 5 to 8 degrees. Add a basement dehumidifier set to 45 percent and the stripe is gone next winter.
The balcony bridge. A concrete balcony that runs through the wall cools the interior ceiling near the connection. You see scattered mold dots along that inside line. During renovation, a structural thermal break pad is added at the connection and exterior insulation wraps up under the balcony. Inside, the ceiling stays warm and clean.
Materials That Actually Help
Some materials make this easier. We like solutions that boost continuity and resist mold while playing nicely with the rest of the assembly:
Exterior rigid insulation like mineral wool boards or polyiso warms the sheathing and studs. It’s a top performer for stopping thermal bridging mold at clear-field and linear bridges.
Closed-cell spray foam at rim joists and tricky geometry kills air leaks and adds high R per inch with a continuous layer. It’s not the only answer, but it shines in messy spots.
Blown-in dense-pack cellulose fills odd cavities better than batts and reduces convection loops. Pair it with an exterior CI layer for a strong one-two. We talk about choosing mold-smart materials in our guide to building materials that prevent mold growth.
Thermally broken windows and doors reduce the cold frame effect. Combine that with insulated jamb extensions and a backer rod plus foam install for a warmer reveal.
Smart vapor retarders help walls dry the right way while limiting winter vapor drive. They’re not a thermal fix, but they help keep surfaces out of the wet zone.
Details That Make Or Break
The difference between a mold-free corner and a fuzzy one is often in the details. A few that pay big dividends:
Carry insulation across structure. If the wall has exterior CI, continue it past rim joists and up roof edges. Don’t leave 3-inch uninsulated gaps at transitions. That’s where cold spot condensation starts.
Extend insulation at window returns. Use insulated jamb extensions or rigid foam returns so the interior reveal is not a chilled fin.
Seal first, then insulate. Air leaks blow your thermal gains. Always cap penetrations with sealant or foam before burying them under insulation layers.
Mind your dew point in basements. Cold concrete and summer air are a mold combo. Dehumidify, use continuous rigid foam against concrete before framing, and keep paper-faced drywall off concrete.
Vent to the exterior. Bath and kitchen exhaust must go outside with insulated ducts and sealed connections. Attic dumping is an invitation to mold.
Quick Reference: Bridge, Clue, Fix
| Thermal Bridge | Telltale Mold Clue | Best Fix |
|---|---|---|
| Stud grid in exterior wall | Ghosting lines, patchy fuzz on paint | Add exterior CI, air seal outlets and plates |
| Slab edge or rim joist | Baseboard mold, musty smell in winter | Edge insulation, rim spray foam, dehumidify |
| Window frames and reveals | Corner fuzz, morning condensation | Thermally broken frames, insulated returns |
| Balcony or canopy penetration | Ceiling dots near connection | Structural thermal break, exterior wrap |
| Uninsulated bath fan duct | Spots around fan, dripping in cold weather | Insulated, sloped duct to exterior, run fan |
When To Call A Pro
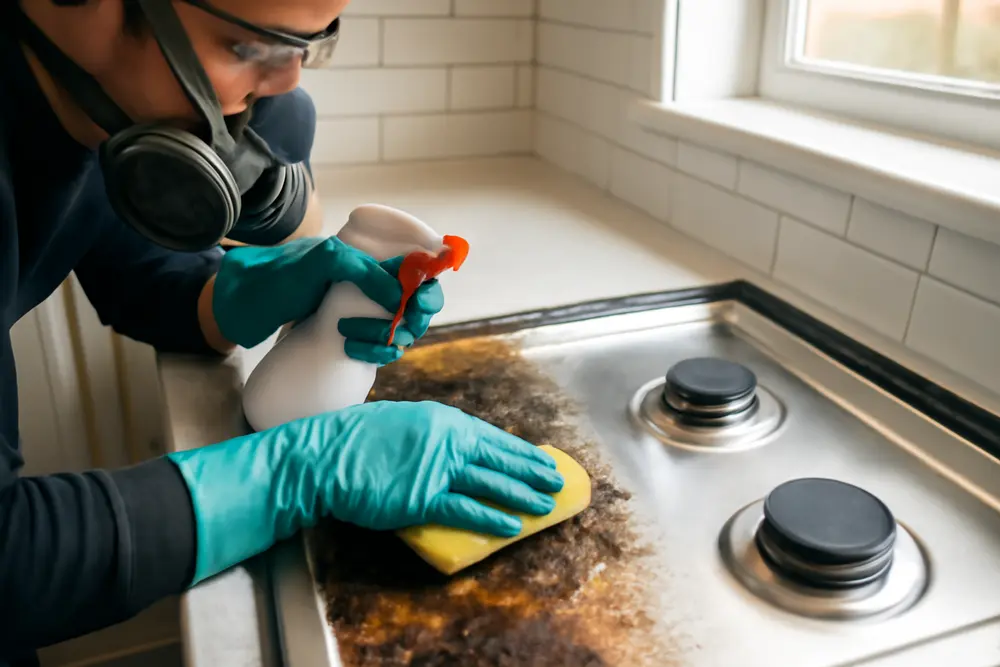
If you can see more than a few square feet of growth, smell mustiness across multiple rooms, or keep cleaning the same area only to have mold return, it’s time to bring in a remediation pro with building science chops. A good contractor won’t just remove mold. They’ll test humidity, scan for cold bridges, open up suspect areas safely, and correct the thermal and air sealing problems so you don’t fund another regrowth next season. Our crew follows containment and removal protocols, treats affected materials, documents moisture and temperature conditions, and lines up the right insulation and air sealing scopes to keep it from coming back.
FAQs
Is thermal bridging mold different from leak-driven mold?
Yes. Leak-driven mold comes from liquid water entering assemblies, often leaving stains, swelling, or dripping. Thermal bridging mold feeds on micro-condensation forming on cold interior surfaces. It can happen without any obvious wetness. The fix for leak-driven mold is water management and drying. The fix for thermal bridging mold is warming the surface with CI and thermal breaks, sealing air leaks, and controlling indoor RH.
Can I paint over thermal bridging mold and call it a day?
You can paint over anything. The mold will return if the surface stays cold and the humidity stays high. Clean and treat the mold correctly, then remove the cause by adding insulation continuity, sealing air leaks, and dropping RH. Stain-blocking primers can hide ghosting, but only thermal and moisture control stops the comeback tour.
What indoor humidity should I target to avoid cold spot condensation?
In heating season, target 35 to 45 percent RH depending on outdoor temps. In cooling season, keep it under 55 to 60 percent. Warmer interior surfaces from CI and thermal breaks give you more wiggle room, but if you regularly sit above 60 percent, expect condensation on the coldest surfaces.
Do I need a full exterior retrofit to stop thermal bridging mold?
Not always. Exterior continuous insulation is a top-tier fix, but targeted upgrades work too. Rim joist spray foam, insulated window returns, interior foam-backed drywall on the coldest walls, and proper bath fan duct insulation can knock out many hot spots. We often phase work during siding or window projects to make it affordable and efficient.
How do I know which spots to fix first?
Use a thermal scanner on a cold morning and note the biggest temperature drops, then compare with RH readings. Prioritize areas with the largest delta to room temperature and any visible growth. Slab edges, rim joists, and window reveals usually lead the pack. Fixing those raises overall comfort and slashes energy loss while stopping mold.
Ready For A Warmer, Cleaner Home?
If you can point to a cold stripe with one hand and a spot of fuzz with the other, you’ve already diagnosed the neighborhood: thermal bridging mold fueled by cold spot condensation. We’ll confirm with thermal imaging and moisture testing, clean up the growth safely, and line up the right mix of continuous insulation, air sealing, and humidity control so it does not come back. If you want fewer drafts, lower bills, and walls that don’t grow beards, schedule an inspection. We’ll bring the science, the gear, and just enough attitude to bully those bridges into retirement.
Further reading and sources: Building Science Corporation on thermal control, ContinuousInsulation.org on thermal bridging, ASHRAE on condensation and mold, roof-wall junction study, and our posts on insulation, water damage, and mold and materials that prevent mold growth.